Arduino
Tinkering
以现有的技术,使用便宜、二手或是废弃的设备,改造出全新的东西。
开发工具
Arduino支持两种语言:
- Arduino自带IDE中支持的抽象度更高更容易使用的Processing语言
- AVR-GCC环境下使用更加底层效率更高的C语言
Arduino是IDE和硬件平台,IDE以Java编写,并使用Processing语言。 好处是简化了开发,但是也比C要弱:
- C有准确的执行时间,没有隐藏代码,写什么就执行什么
- C更容易访问硬件和中断
- 便于在多种MCU之间移植
安装Arduino
http://playground.arduino.cc/Linux/Ubuntu
安装前环境配置
下面两个命令是arduino安装环境的基本配置:
sudo apt-get install gcc-avr avr-libc

sudo apt-get install openjdk-7-jre
安装arduino
这个命令直接安装arduino。
sudo apt-get install arduino
if you use the USB port to dialog, you should add yourself to the group
dialout in order to have write permissions on that port:
sudo usermod -aG dialout <myuser>
Share Tweet
卸载驱动
由于ubuntu的驱动会导致arduino板不可用,所以必须卸载相关驱动。
如果使用下面的命令,在/dev下出现ttyACM0之类的设备,
说明你需要卸载相应的ubuntu驱动:
~$ ls /dev/ttyACM*

/dev/ttyACM0
下面的命令直接卸载brltty驱动:
sudo apt-get remove brltty
之后出现一行,说明只有重启之后才能实现完成卸载。
ureadahead will be reprofiled on next reboot
Emacs 安装 arduino插件
下载arduino-mode.el。在github上有这个插件,直接在该网址下载:https://github.com/bookest/arduino-mode
将arduino-mode.el放到~/.emacs.d/下,并在~/.emacs下添加
(require 'arduino-mode)
输入M-x arduino-mode直接使用。
其实,你还是上Emacs Wiki 看看,上面更详细。
arduino在linux环境下配置
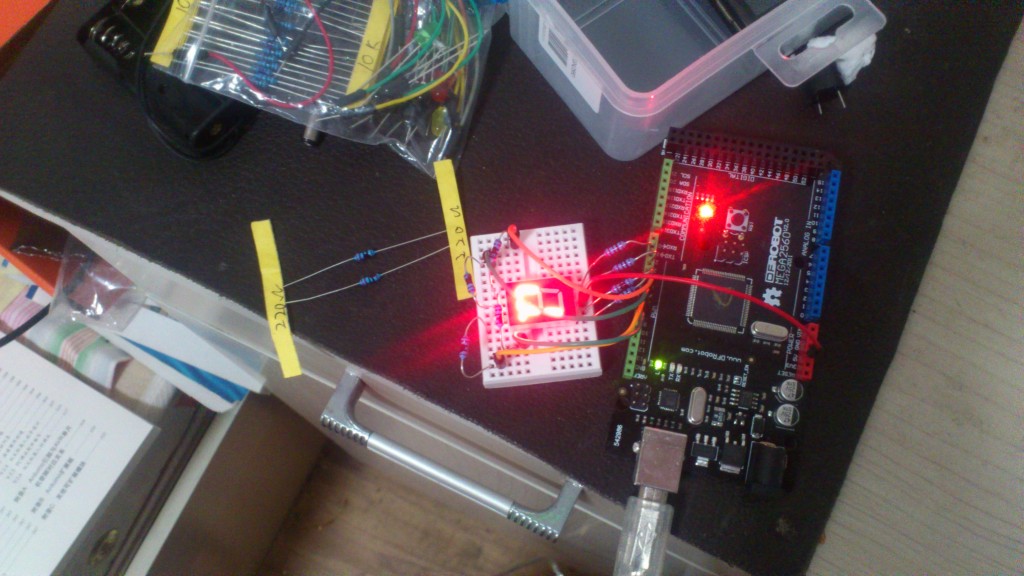
linux下配置arduino开发环境很简单,但是由于权限,还是碰到了一些问题。 linux对arduino设备是能够自动识别的,不需要单独安装驱动。lsusb可以查看到插入的设备,如图,最后一行就是新的usb设备:

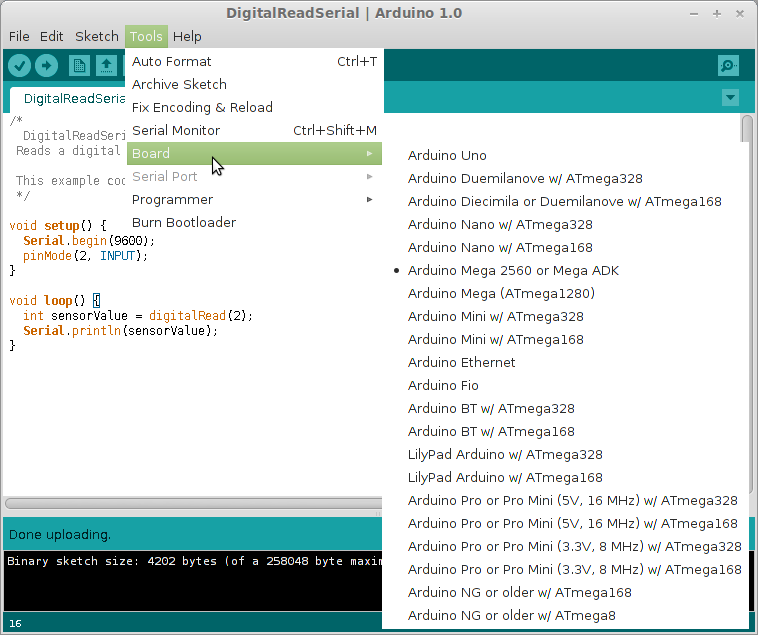
这样就可以了,打开arduino的开发IDE,选择Tools->Board->选择你的ardunio开发板的型号,我的是ATmega2560如图:
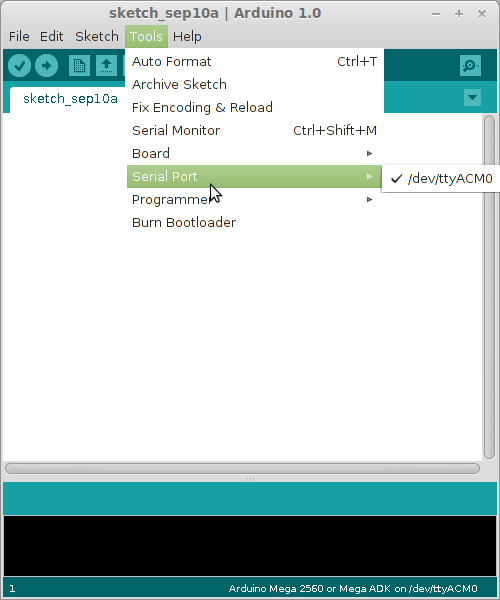
下一步该是选择串口了,这是你会遇到一个问题,就是Serial Port选项是灰色的,无法选择,这是权限的问题,我们这样来做,打开~/.arduino/preferences.txt文件,将文件中Serial.port=com1修改为Serial.port=/dev/ttyACM0(设备名称可以通过dmesg来查看),保存,同时以管理员权限运行开发环境sudo arduino这样就完成了开发环境的搭建。
编写应用,下载到板子上,我是检测一个低电平,并通过写入串口,下图是用minicom查看到的结果。
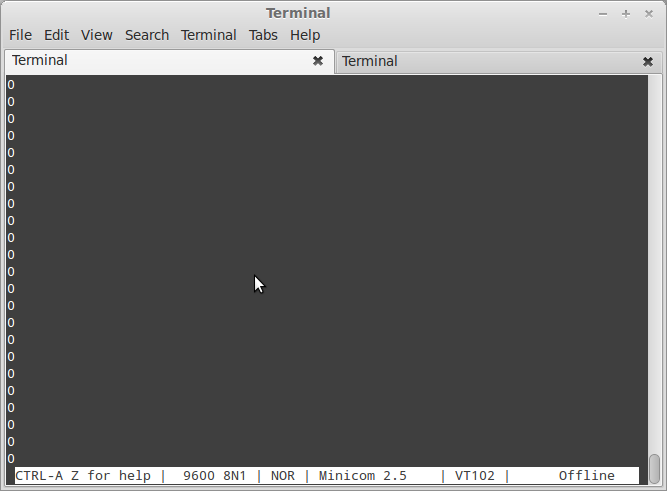
结果:
linux下使用arduino
gpasswd -a $USER uucp
gpasswd -a $USER tty
Plug In your arduino. if prior to arduino UNO you should find
/dev/ttyUSBX
where X is a number that may vary.
if arduino UNO you should find
/dev/ttyACMX
where X is a number that may vary
that easy. Plug your arduino, then from terminal:
dmesg | tail
you will see something like (for arduino < UNO):
ftdi_sio 3-2:1.0: FTDI USB Serial Device converter detected
usb 3-2: Detected FT232RL
usb 3-2: Number of endpoints 2
usb 3-2: Endpoint 1 MaxPacketSize 64
usb 3-2: Endpoint 2 MaxPacketSize 64
usb 3-2: Setting MaxPacketSize 64
and for UNO:
[ 447.848039] usb 3-1: new full speed USB device using uhci_hcd and address 2
[ 448.046079] usb 3-1: New USB device found, idVendor=2341, idProduct=0001
[ 448.046085] usb 3-1: New USB device strings: Mfr=1, Product=2, SerialNumber=220
[ 448.046089] usb 3-1: Product: Arduino Uno
[ 448.046092] usb 3-1: Manufacturer: Arduino (www.arduino.cc)
and for Leonardo (unless you're running a recent version of Ubuntu):
或者使用lsusb.
在linux下使用arduino的时候,会发现串口端serialport是灰色的,也就是找不到USB接口。
解决方法是:插上你的arduino到电脑的USB上,在命令行里运行:
dmesg | tail
你会看到(我到是arduinoduemilenove)
ftdi_sio 5-1:1.0: FTDI USB SerialDevice converter detected
usb 5-1: Detected FT232RL
usb 5-1: Number of endpoints 2
usb 5-1: Endpoint 1 MaxPacketSize 64
usb 5-1: Endpoint 2 MaxPacketSize 64
usb 5-1: Setting MaxPacketSize 64
usb 5-1: FTDI USB Serial Deviceconverter now attached to ttyUSB0
再以普通用户键入:
ls-l /dev/ttyUSB0 //这个0就是上面检测到的
你会得到比如:
crw-rw----1 root dialout 188, 0 5 AUG ttyUSB0之类的。
这个dialout名字就是下面我们要用到的组名。
现在把用户加到这个组里面:
usermode-a -G dialout amiko //可以切换成root用户来操作
再键入:
ls-ld /run/lock
或
ls-ld /var/lock
然后出现以下字样:
drwxrwxrwt5 root root 4096 9 dic 21.39 /var/lock
运行root下的
chmodo+rwx /run/lock
或
chmodo+rwx /var/lock
最后断开arduino,系统登出然后再登入再运行arduino就可以看到serialport里出现了/dev/ttyUSB0这个选项,你勾选。
运行系统自带的BLINK,就能看到板子上的LED13灯闪烁。
至此arduino在linux下顺利运行。
Arduino IDE中编译与烧录程序
「Tools」菜单的「Board」选择开发板的类型, 「Serial Port」选择电脑连接开发板的端口。
可以直接用File菜单中自带的Blink闪灯程序来测试:
/*
  Blink
 Turns on an LED on for one second, then off for one second, repeatedly.

 This example code is in the public domain.
 */

// Pin 13 has an LED connected on most Arduino boards.
// give it a name:
int led = 13;

// the setup routine runs once when you press reset:
void setup() {
  // initialize the digital pin as an output.
  pinMode(led, OUTPUT);
}

// the loop routine runs over and over again forever:
void loop() {
  digitalWrite(led, HIGH);   // turn the LED on (HIGH is the voltage level)
  delay(5000);               // wait for a second
  digitalWrite(led, LOW);    // turn the LED off by making the voltage LOW
  delay(1000);               // wait for a second
}
- 直接在工具栏的图标里找「勾」表示编译,完成后在正文信息框中显示「Done Compiling」。
- 然后用「右方向箭头」表示烧录到Arduino上。Anduino上的「TX」与「RX」灯闪表示正在接收信息。 每传送一个字节(byte)会闪一下。完成以后正文信息框显示传送成功。
板上标记为「L」的LED灯开始亮五秒暗一秒的循环。