并发方案
原子操作
原子操作类
boolean, byte, short, int, long, float 和 double都有对应的原子类。
java.utils.concurrent.atomic包装器把对象包装成原子操作。
AtomicLong类的原子方法incrementAndGet()和decresmentAndGet()。
原子性的值操作:
| current method | suggested syntax | notes |
| x.getAndIncrement() |
x++ or x += 1
|
|
| x.incrementAndGet() |
++x
|
|
| x.getAndDecrment() |
x-- or x -= 1
|
|
| x.decrementAndGet() |
--x
|
|
| x.addAndGet(y) |
(x += y)
|
|
| x.getAndAdd(y) |
((x += y)-y)
|
|
| x.compareAndSet(e, y) |
(x == e ? x = y, true : false)
|
Need to add the comma syntax used in other languages. |
原子性的赋值操作:
/* suggested syntax     current method              notes    */
   x *= 2;           // Atomic multiplication
   x -= y;           // Atomic subtraction
   x /= y;           // Atomic division
   x %= y;           // Atomic modulus
   x <<= y;          // Atomic shift
   x >>= z;          // Atomic shift
   x >>>= w;         // Atomic shift
   x &= ~y;          // Atomic and              clears bits
   x |= z;           // Atomic or               sets bits
   x ^= w;           // Atomic xor              flips bits
JEP 193 - Enhanced Volatiles
There is a JEP 193 to add this functionality to Java. An example is;
class Usage {

    volatile int count;

    int incrementCount() {
        return count.volatile.incrementAndGet();
    }

}
IMHO there is a few limitations in this approach.
- The syntax is fairly significant change. Changing the JMM might not require many changes the the Java syntax and possibly no changes to the compiler.
-
It is a less general solution. It can be useful to support operations like
volume
+=quantity; where these are double types. -
It places more burden on the developer to understand why he/she should use
this instead of
x++;
LongAdder DoubleAdder
Java 8 对于多线程应用更为重要的类是新增的LongAdder和DoubleAdder,在多线程下, 原子实现比AtomicInteger和AtomicLong提供了更优越的性能。
一些简单的指标阐述了AtomicLong和LongAdder之间的性能不同点——测试下面这些指标,我们使用了可以访问Intel Xeon E5-2670所有8个核的m3.2xlarge EC2实例。
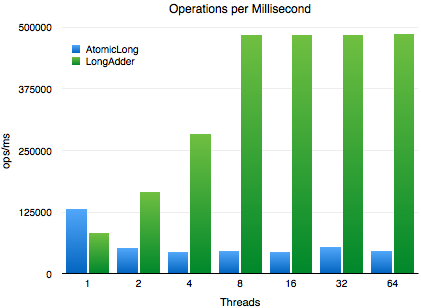
在单线程下,新的LongAdder慢了1/3,但是当多个线程在争着增加字段,LongAdder则显示出了自己的价值。注意到,每个线程所做的唯一事情就是试图增加计数——这是一个最极端形式的综合标准。这里的竞争比你在实际应用程序中可能看到的要高的多,但是有时候你确实需要这种共享计数器,而LongAdder带来了很大的帮助。
你可以在我们的java-8-benchmarks仓库中找到这些基准测试程序数值的代码。它使用了 JMH来完成实际工作,并以 Marshall的 gradle-jmh-demo为基础。JMH能够为程序员完成对精度要求很高的工作,并有效降低编程的难度,保证了结果数据能够反应目前在基于JVM性能测试精度的较高水准。JMH并非一定在perf下运行,所以我们还做了一些 单例测试。
Perf-stat下更多的细节
通过单例测试,我们可以在 perf-sata下对测试程序有更多的控制力度,以及获取程序运行中更多的细节。最基本的指标是每一个标准运行占用的时间。这些基准都在运行在英特尔I7-2600k内核上(实际硬件,不是虚拟的)。

在单线程的情况下,AtomicLong稍微快一点,在2个线程的时候,AtomicLong比LongAdder慢近4倍,而在线程数和机器CPU核数一致的情况下,AtomicLong比LongAdder慢近5倍。
让人印象更深刻的是,直到线程数超过CPU的物理核数(在这个例子中是4)之前,LongAdder的性能一直是个常量。
一个周期内的指令
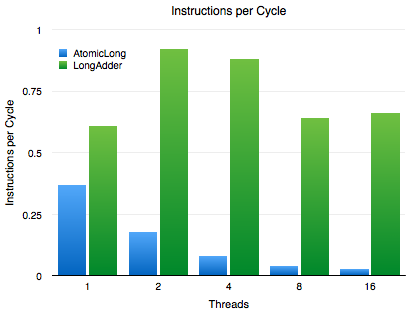
周期内的指令衡量标准是:」CPU运行指令的时间」 对比 「CPU等待加载内存或者处理高速缓存加载或匹配数据的时间」。在这个例子中,我们看到Atomic在多线程的情况下IPC(周期内的指令)指标非常的差,而LongAdder维持着一个更健康的IPC(周期内的指令)指标. 从4线程到8线程之间的下降可能是因为CPU有4个核,每个核中有2个硬件线程, 而硬件线程在这个情况下没有实际上的帮助。
空闲时间
处理器上的执行流水线主要分为2个部分:负责获取和解码操作的前端,和负责执行指令的后端。获取的操作没有什么值得讨论的,所以我们跳过前端。
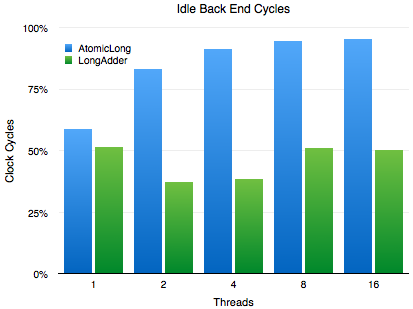
后端揭示了更多幕后的情况,AtomicLong的实现在后端留下了比LongAdder几乎一倍的周期闲置。AtomicLong的IPC较低和它的高闲置时间是直接相关的:CPU内核花费了大量时间来决定它们中间的谁去控制包含AtomicLong的缓存线。
原子包装器
包装集合为不可变版本:Collections.unmodifiableLists(list)
包装同步版:SynchronizedMap m = Collection.SynchronizedMap(new HashMap())
把一个引用包装成原子访问:
private final AtomicReferency<BigInteger> lastNumber =
	new AtomicReferency<BigInteger>()

private final AtomicReferency<BigInteger> firstNumber =
	new AtomicReferency<BigInteger>()
但注意上面的例子,虽然每个数字的访问是原子性的,但一起操作两个数字的方法不是 线程安全的。
@atomic注解
任何域加上@atomic会使得整个表达式带有原子性。非volatile或非atomic的变量,
可以在表达式(加上@atomic的表达式)开始执行前读取或者在表达式完成后设置。
表达式本身可能需要上锁,CAS(译者注:compare and swap)操作或者TSX,取决于
依赖于平台的CPU。如果所有域是只读的,或者只有一个域可写,则与volatile的功能
一致。
原子布尔型
现在的AtomicBoolean类加上对象头以及可能的填充字节(与引用一样)需要4字节。 把这个域写入代码中,可能是这样的:
@atomic boolean flag;

this.flag = !this.flag; // toggle the flag.
这段代码会如何运行呢?并不是所有的平台都支持一字节的原子操作,比如Unsafe类就 没有一字节的CAS操作。这可以通过布尔屏蔽来实现。
// possible replacement.
while(true) {
	// word align the access.
	int num = Unsafe.getUnsafe().getVolatileInt(this, FLAG_OFFSET & ~3);

	int value ^= 1 << ~(0xFF << (FLAG_OFFSET & 3) * 8) ;

	if (Unsafe.getUnsafe().compareAndSwapInt(
				this, FLAG_OFFSET & ~3, num, value))
	{
		break;
	}
}
上面一段代码的while循环是一个CAS操作,确保取反操作的原子性。
- 第一句是获取修改前的内容。flag变量占用一个字节,这里直接获取包含flag变量的一个双字(4字节)。
- 第二句是计算flag取反后,这个双字应该存放的内容,但这里的代码应该有问题,读者可以自己修改。
- 第三句进行compareAndSwapInt操作,存入取反后的内容。整个取反过程保证了这四字节的内容不会被其他线程修改。
原子性Double
Java标准库中不支持AtomicDouble,这里是基于AtomicLong的变种。请看下面的例子:
@atomic double a = 1;
volatile double b = 2;

a += b;
放在今天,可能会怎么实现呢?
while(true) {
	double _b = Unsafe.getUnsafe().getVolatileDouble(this, B_OFFSET);
	double _a = Unsafe.getUnsafe().getVolatileDouble(this, A_OFFSET);
	long aAsLong = Double.doubleToRawLongBits(_a);
	double _sum = _a + _b;
	long sumAsLong = Double.doubleToRawLongBits(_a);
	if (Unsafe.getUnsafe().compareAndSwapLong(
				this, A_OFFSET, aAsLong, sumAsLong))
	{
		break;
	}
}
两个原子域
使用Intel的TSX,你可以把几个域打包到一个硬件事务中。但如果你的平台不支持TSX, 又不使用锁,这可行么?
@atomic int a = 1, b = 2;

a += b * (b % 2 == 0 ? 2 : 1);
如果有多个域一起是原子的,使用CAS仍然可行。将来会设计一个CAS2操作能够检查两个64位的值。所以目前,下面的例子使用两个4字节的变量。
assert A_OFFSET + 4 == B_OFFSET;
while(true) {
    long _ab = Unsafe.getUnsafe().getVolatileLong(this, A_OFFSET);
    int _a = getLowerInt(_ab);
    int _b = getHigherInt(_ab);
    int _sum = _a + _b * (_b % 2 == 0 ? 2 : 1);
    int _sum_ab = setLowerIntFor(_ab, _sum);
    if (Unsafe.getUnsafe().compareAndSwapLong(this, A_OFFSET, _ab, _sum_ab))
        break;
}
注意:这个操作能以原子的方式只修改a、只修改b或同时修改ab。
原子引用
一个作用在不可变对象上的普通用例,比如BigDecimal:
@atomic BigDecimal a;
BigDecimal b;
a = a.add(b);
在启用CompressedOops(普通对象指针压缩)的系统或者是32位的JVM上,可以通过下面 这种方式实现:
BigDecimal _b = this.b;
while(true) {
	BigDecimal _a = (BigDecimal) Unsafe.getUnsafe().getVolatileObject(
			this, A_OFFSET);
	BigDecimal _sum = _a.add(_b);
	if (Unsafe.getUnsafe().compareAndSwapLong(this, A_OFFSET, _a, _sum)) {
		break;
	}
}
更复杂的例子
总会有这样的例子,因为它们太复杂无法运行在你的系统中。它们可能能运行在支持 TSX的系统上,或者支持HotSpot的系统上。但在你的系统上,可能需要一些回退 (使用旧的技术达到目的)。
@atomic long a, b, c, d;

a = (b = (c = d + 4) + 5 ) + 6;
目前,上面的例子还不支持,它在一个表达式中设置了多个long值。 但是,退一步说可以使用已有的锁机制。
synchronized(this) {
	a = (b = (c = d + 4) + 5 ) + 6;
}
总结
通过添加注解,我们能为普通域增加原子操作而无需改变语法。这可以作为语言的自然扩展 ,而不会破坏后向兼容性。
并发容器
Java 5中新加入的并发类为并发环境进行了优化。Queue和BlockingQueue实现了队列,
CuncurrentHashMap实现并发Map。
Java 6引入了ConcurrentSkipListMap和ConcurrentSkipListSet对应Sortedmap和
SortedSet。
并发容器的迭代器不会抛出ConcurrentModificationExcetpion,可以不加锁就进行迭代
。这样的迭代器具有弱一致性(Weakly Consistent),而不是「及时失败」。弱一致性可以
容忍并发的修改,当创建迭代器时会遍历已有的元素,并可以(但不保证)在迭代器被构造
后将修改操作反映给容器。
对于并发容器来说size或isEmpty这样的方法返回的结果可能是已经过期的结果。但
在并发环境下这样的状态总是在不断变化的,所以这样的方法意义不大。
并发队列
常用队列:
-
Queue不阻塞,空时取返回空;满时放抛异常。 -
SynchrousQueue会同步插入与删除操作。 -
BlockingQueue存取操作会阻塞。 -
PriorityBlockingQueue带优先级的队列。
阻塞队列
简单的阻塞队列可以用LinkedblockingQueue或ArrayBlockingQueue。
对于队列空取或满存的情况有四种策略:
- 抛出异常。
-
特殊值。空取时为
null;满存时为false。 - 阻塞。
- 超时。只会阻塞指定的时间。
| 抛出异常 | 特殊值 | 阻塞 | 超时 | |
| 插入 | add(e) | offer(e) | put(e) | offer(e, time, unit) |
| 移除 | remove() | poll() | take() | poll(time, unit) |
| 检查 | element() | peek() | 不可用 | 不可用 |
饱和策略
-
Abort:抛异常,调用者处理异常。 -
Discard:丢掉任务。 -
DiscardOlds:丢掉最老的任务。 -
DiscardPolicy:丢掉优先级最低的。 -
Caller_Runs:不抛异常,退回给调用者。用一个execute()执行它。
队列工作的问题
请求来太快了把等待队列也占满了。太长或是无限的队列,用SynchronizeQueue避免
队列任务。它不是真的队列而是一个移交机制(相当于只有一个容量的队列),前一个
请求没有处理完后一个请求会被拒绝。
阻塞队列不能用循环忙等待,标志位退出的方式。可以在队列里放一个特殊成员,读到它 就表示应该退出。
实现简单的阻塞队列
尽管JDK中已经包含了阻塞队列的官方实现,但是熟悉其背后的原理还是很有帮助的。
阻塞队列的实现类似于带上限的Semaphore的实现。下面是阻塞队列的一个简单实现。 线程1往阻塞队列中添加元素,而线程2从阻塞队列中移除元素:
public class BlockingQueue {

	private List queue = new LinkedList();
	private int  limit = 10;

	public BlockingQueue(int limit) { this.limit = limit; }

	public synchronized void enqueue(Object item) throws InterruptedException {
	  while (this.queue.size() == this.limit) { wait(); }
	  if(this.queue.size() == 0) { notifyAll(); }
	  this.queue.add(item);
	}

	public synchronized Object dequeue() throws InterruptedException {
	  while (this.queue.size() == 0) { wait(); }
	  if (this.queue.size() == this.limit) { notifyAll(); }
	  return this.queue.remove(0);
	}

}
必须注意到,在enqueue和dequeue方法内部,只有队列的大小等于上限(limit)
或者下限(0)时,才调用notifyAll方法。如果队列的大小既不等于上限,也不等于
下限,任何线程调用enqueue或者dequeue方法时,都不会阻塞,都能够正常的往
队列中添加或者移除元素。
ConcurrentHashMap
ConcurrentHashMap等为并发环境设计。为了优化性能不只用了一个锁,而是采用分段锁
(Lock Striping),所以增加了并发性能。
ConcurrentHashMap是为了强化并发环境下使用,所以没有办法对它的Map加锁以独占
访问。这是弱化独占访问而加强了get、put、containsKey、remove等方法的
并发性的取舍。
额外的原子操作
虽然不能加锁独占方问,但为一些复合操作为提供了原子操作。如:「没有则添加」、「相等 则替换」。
public interface ConcurrentMap<K,V> extends Map<K,V> {

	// Insert into map only if no value is mapped from K
	V putIfAbsent(K key, V value);

	// Remove only if K is mapped to V
	boolean remove(K key, V value);

	// Replace value only if K is mapped to oldValue
	boolean replace(K key, V oldValue, V newValue);

	// Replace value only if K is mapped to some value
	V replace(K key, V newValue);

}
ConcurrentHashMap的实现原理
ConcurrentHashMap的出现主要为了解决hashmap在并发环境下不安全,JDK1.8ConcurrentHashMap的设计与实现非常精巧,大量的利用了volatile,CAS等乐观锁技术来减少锁竞争对于性能的影响,ConcurrentHashMap保证线程安全的方案是:
- JDK1.8:synchronized+CAS+HashEntry+红黑树;
- JDK1.7:ReentrantLock+Segment+HashEntry。
JDK7 ConcurrentHashMap
在JDK1.7中ConcurrentHashMap由Segment(分段锁)数组结构和HashEntry数组组成,且主要通过Segment(分段锁)段技术实现线程安全。
Segment是一种可重入锁,是一种数组和链表的结构,一个Segment中包含一个HashEntry数组,每个HashEntry又是一个链表结构,因此在ConcurrentHashMap查询一个元素的过程需要进行两次Hash操作,如下所示:
- 第一次Hash定位到Segment,
- 第二次Hash定位到元素所在的链表的头部
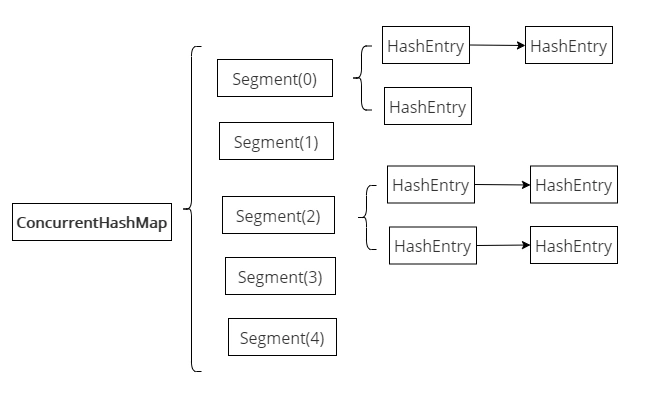
正是通过Segment分段锁技术,将数据分成一段一段的存储,然后给每一段数据配一把锁,当一个线程占用锁访问其中一个段数据的时候,其他段的数据也能被其他线程访问,能够实现真正的并发访问。
这样结构会使Hash的过程要比普通的HashMap要长,影响性能,但写操作的时候可以只对元素所在的Segment进行加锁即可,不会影响到其他的Segment,ConcurrentHashMap提升了并发能力。
JDK8 ConcurrentHashMap
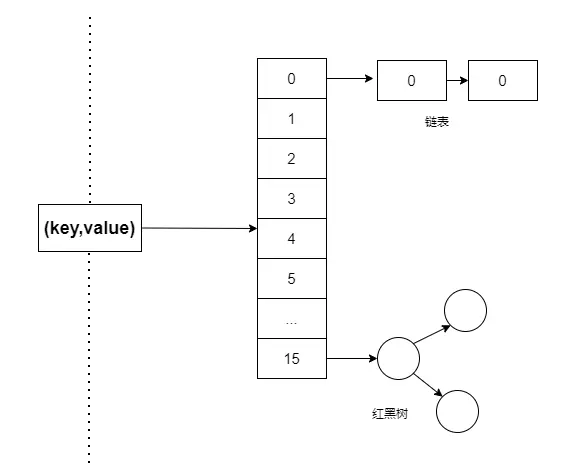
在 JDK8ConcurrentHashMap内部机构:数组+链表+红黑树,Java 8在链表长度超过一定阈值(8)时将链表(寻址时间复杂度为O(N))转换为红黑树(寻址时间复杂度为O(long(N))),结构基本上与功能和 JDK8的HashMap一样,只不过ConcurrentHashMap保证线程安全性。
但在JDK1.8中摒弃了Segment分段锁的数据结构,基于CAS操作保证数据的获取以及使用synchronized关键字对相应数据段加锁来实现线程安全,这进一步提高了并发性。
CAS原理:concurrency.cas
static class Node<K,V> implements Map.Entry<K,V> {
        final int hash;
        final K key;
        volatile V val;  //使用了volatile属性
        volatile Node<K,V> next;  //使用了volatile属性
        ...
    }
ConcurrentHashMap采用Node类作为基本的存储单元,每个键值对(key-value)都存储在一个Node中,使用了volatile关键字修饰value和next,保证并发的可见性。其中Node子类有:
- ForwardingNode:扩容节点,只是在扩容阶段使用的节点,主要作为一个标记,在处理并发时起着关键作用,有了ForwardingNodes,也是ConcurrentHashMap有了分段的特性,提高了并发效率
- TreeBin:TreeNode的代理节点,用于维护TreeNodes,ConcurrentHashMap的红黑树存放的是TreeBin
- TreeNode:用于树结构中,红黑树的节点(当链表长度大于8时转化为红黑树),此节点不能直接放入桶内,只能是作为红黑树的节点
- ReservationNode:保留结点
ConcurrentHashMap中查找元素、替换元素和赋值元素都是基于sun.misc.Unsafe中
「原子操作」实现「多并发的无锁化」操作。
static final <K,V> Node<K,V> tabAt(Node<K,V>[] tab, int i) {
        return (Node<K,V>)U.getObjectAcquire(tab, ((long)i << ASHIFT) + ABASE);
    }

    static final <K,V> boolean casTabAt(Node<K,V>[] tab, int i,
                                        Node<K,V> c, Node<K,V> v) {
        return U.compareAndSetObject(tab, ((long)i << ASHIFT) + ABASE, c, v);
    }

    static final <K,V> void setTabAt(Node<K,V>[] tab, int i, Node<K,V> v) {
        U.putObjectRelease(tab, ((long)i << ASHIFT) + ABASE, v);
    }
ConcurrentHashMap的put()方法
ConcurrentHashMap的put的流程步骤
- 如果key或者value为null,则抛出空指针异常,和HashMap不同的是HashMap单线程是允许为Null:
if (key == null || value == null) throw new NullPointerException();
-
for的死循环,为了实现CAS的无锁化更新,如果table为null或者table的长度为0,
则初始化table,调用
initTable()方法(第一次put数据,调用默认参数实现,其中重要的sizeCtl参数)。
//计算索引的第一步,传入键值的hash值
int hash = spread(key.hashCode());
int binCount = 0; //保存当前节点的长度
for (Node<K,V>[] tab = table;;) {
    Node<K,V> f; int n, i, fh; K fk; V fv;
    if (tab == null || (n = tab.length) == 0)
        tab = initTable(); //初始化Hash表
    ...
}
- 确定元素在Hash表的索引
通过hash算法可以将元素分散到哈希桶中。在ConcurrentHashMap中通过如下方法确定数组索引:
第一步:
static final int spread(int h) {
    return (h ^ (h >>> 16)) & HASH_BITS;
}
第二步:
(length-1) & (h ^ (h >>> 16)) & HASH_BITS);
-
通过
tableAt()方法找到位置tab[i]的Node,当Node为null时为没有hash冲突的话, 使用casTabAt()方法CAS操作将元素插入到Hash表中,ConcurrentHashmap 使用CAS无锁化操作,这样在高并发hash冲突低的情况下,性能良好:
else if ((f = tabAt(tab, i = (n - 1) & hash)) == null) {
	//利用CAS操作将元素插入到Hash表中
	if (casTabAt(tab, i, null, new Node<K,V>(hash, key, value)))
		break;  // no lock when adding to empty bin(插入null的节点,无需加锁)
}
-
当f不为null时,说明发生了hash冲突,当
f.hash == MOVED==-1时, 说明ConcurrentHashmap正在发生resize操作,使用helpTransfer()方法帮助正在进行 resize操作:
else if ((fh = f.hash) == MOVED) //f.hash == -1
    //hash为-1 说明是一个forwarding nodes节点,表明正在扩容
    tab = helpTransfer(tab, f);
-
以上情况都不满足的时,使用synchronized同步块上锁当前节点Node ,
并判断有没有线程对数组进行了修改,如果没有则进行:
-
遍历该链表并统计该链表长度
binCount,查找是否有和key相同的节点, 如果有则将查找到节点的val值替换为新的value值,并返回旧的value值, 否则根据key,value,hash创建新Node并将其放在链表的尾部 -
如果Node f是TreeBin的类型,则使用红黑树的方式进行插入。然后则退出
synchronized(f)锁住的代码块
-
遍历该链表并统计该链表长度
//当前节点加锁
synchronized (f) {
	//判断下有没有线程对数组进行了修改
	if (tabAt(tab, i) == f) {
		//如果hash值是大于等于0的说明是链表
		if (fh >= 0) {
			binCount = 1;
			for (Node<K,V> e = f;; ++binCount) {
				K ek;
				// 插入的元素键值的hash值有节点中元素的hash值相同,
				// 替换当前元素的值
				if (e.hash == hash &&
						((ek = e.key) == key ||
						 (ek != null && key.equals(ek)))) {
					oldVal = e.val;
					if (!onlyIfAbsent)
						//替换当前元素的值
						e.val = value;
					break;
				}
				Node<K,V> pred = e;
				//如果循环到链表结尾还没发现,那么进行插入操作
				if ((e = e.next) == null) {
					pred.next = new Node<K,V>(hash, key, value);
					break;
				}
			}
		} else if (f instanceof TreeBin) { //节点为树
			Node<K,V> p;
			binCount = 2;
			if ((p = ((TreeBin<K,V>)f).putTreeVal(hash, key,
							value)) != null) {
				oldVal = p.val;
				if (!onlyIfAbsent)
					//替换旧值
					p.val = value;
			}
		} else if (f instanceof ReservationNode)
			throw new IllegalStateException("Recursive update");
	}
}
-
执行完
synchronized(f)同步代码块之后会先检查binCount,如果大于等于TREEIFY_THRESHOLD = 8则进行treeifyBin操作尝试将该链表转换为红黑树。
if (binCount != 0) {
	//如果节点长度大于8,转化为树
	if (binCount >= TREEIFY_THRESHOLD)
		treeifyBin(tab, i);
	if (oldVal != null)
		return oldVal;
	break;
}
- 执行了一个addCount方法,主要用于统计数量以及决定是否需要扩容.
addCount(1L, binCount);
ConcurrentHashmap 不支持 key 或者 value 为 null 的原因?
ConcurrentHashmap和hashMap不同的是,concurrentHashMap的key和value都不允许为null,
因为concurrenthashmap它们是用于多线程的,并发的 ,如果map.get(key)得到了null,
不能判断到底是映射的value是null,还是因为没有找到对应的key而为空,
而用于单线程状态的hashmap却可以用containKey(key)去判断到底是否包含了这个null。
put()方法如何实现线程安全呢?
在第一次put数据时,调用initTable()方法
/**
 * Hash表的初始化和调整大小的控制标志。为负数,Hash表正在初始化或者扩容;
 * (-1表示正在初始化,-N表示有N-1个线程在进行扩容)
 * 否则,当表为null时,保存创建时使用的初始化大小或者默认0;
 * 初始化以后保存下一个调整大小的尺寸。
 */
private transient volatile int sizeCtl;
//第一次put,初始化数组
private final Node<K,V>[] initTable() {
	Node<K,V>[] tab; int sc;
	while ((tab = table) == null || tab.length == 0) {
		//如果已经有别的线程在初始化了,这里等待一下
		if ((sc = sizeCtl) < 0)
			Thread.yield(); // lost initialization race; just spin
		//-1 表示正在初始化
		else if (U.compareAndSwapInt(this, SIZECTL, sc, -1)) {
			...
		} finally {
			sizeCtl = sc;
		}
		break;
	}
return tab;
}
使用sizeCtl参数作为控制标志的作用,当在从插入元素时,才会初始化Hash表。
在开始初始化的时候:
-
首先判断
sizeCtl的值,如果sizeCtl < 0,说明有线程在初始化, 当前线程便放弃初始化操作。否则,将SIZECTL设置为-1,Hash表进行初始化。 -
初始化成功以后,将
sizeCtl的值设置为当前的容量值
在不存在hash冲突的时:
else if ((f = tabAt(tab, i = (n - 1) & hash)) == null) {
	//利用CAS操作将元素插入到Hash表中
	if (casTabAt(tab, i, null, new Node<K,V>(hash, key, value)))
		break;  // no lock when adding to empty bin(插入null的节点,无需加锁)
}
在:
(f = tabAt(tab, i = (n - 1) & hash)) == null
中使用tabAt原子操作获取数组,并利用:
casTabAt(tab, i, null, new Node<K,V>(hash, key, value))
CAS操作将元素插入到Hash表中
在存在hash冲突时,先把当前节点使用关键字synchronized加锁,
然后再使用tabAt()原子操作判断下有没有线程对数组进行了修改,
最后再进行其他操作。
为什么要锁住更新操作的代码块?
因为发生了哈希冲突,当前线程正在f所在的链表上进行更新操作,假如此时另外一个线程也需要到这个链表上进行更新操作,则需要等待当前线程更新完后再执行
//当前节点加锁
synchronized (f) {
     //这里判断下有没有线程对数组进行了修改
     if (tabAt(tab, i) == f) {
     ......//do something
 }
}
由于篇幅过于长,分成两部分来讲讲,接下来的内容请看 为了进阿里,死磕了ConcurrentHashMap源码和面试题(二)
应用:生产者-消费者模式
利用队列实现生产者-消费者模式。
双端队列与工作密取
工作密取模式:生产者生成任务加到任务队列中,消费者在处理过程中会产生新的任务。 所以消费都也可以把任务加到工作队列中。
例如:对于网络爬虫来说,一个链接就是一个任务。爬虫把链接加入到队列中,解析器在 解析网页时会发现网页上有的链接,这又是新的任务。解析器要把新的链接再加到队列中 去。
Java 6增加了两种容器类型Deque(发音为deck)与BlockingDeque,分别对应Queue
和BlockingQueue扩展为双端队列,可以实现工作密取模式。
恢复中断
必须处理InterruptedException,不然其他的线程就没有办法中断当前线程了:
public class TaskRunnable implements Runnable {
	BlockingQueue<Task> queue;

	//...

	public void run() {
		try {
			processTask(queue.take());
		} catch (InterruptedException e) {
			// 中断当前线程
			Thread.currentThread().interrupt();
		}
	}
}
信号量(Semaphore)
信号量控制访问的总数。它的操作提原子的:
-
指定资源的总量:
Semaphore sem = new Semaphore(num); -
新访问记录占用资源:
sem.acquire(); -
结束后记录放开资源:
sem.release();
闭锁(Latch)
Latch让多个线程等待把准备工作完成,再一起向下执行。
CountDownLatch是一个实现,通过计数器来控制:
-
子线程调用
countDown方法把计数器减1。 -
主线程调用
await方法等待,等计数器到0了启动。
在任务没有返回值的情况下,CountDownLatch比用Future更合适。
例:在计时测试中使用CountDownLatch来启动与停止线程:
public class TestHarness {
	public long timeTasks(int nThreads, final Runnable task)
			throws InterruptedException {
		final CountDownLatch startGate = new CountDownLatch(1);
		final CountDownLatch endGate = new CountDownLatch(nThreads);

		for (int i = 0; i < nThreads; i++) {
			Thread t = new Thread() {
				public void run() {
					try {
						startGate.await();
						try {
							task.run();
						} finally {
							endGate.countDown();
						}
					} catch (InterruptedException ignored) {
					}
				}
			};
			t.start();
		}

		long start = System.nanoTime();
		startGate.countDown();
		endGate.await();
		long end = System.nanoTime();
		return end - start;
	}
}
栅栏(Barrier)
栅栏和闭锁一样也是控制一组线程,闭锁到一终止状态不能再重新复位了。闭锁用于等待 事件,而栅栏用于等待其他线程。
栅栏的实现类CyclicBarrier可以重复使用,在迭代算法中非常有用。把一个问题分成
多个子问题。
当线程到了栅栏位置以后调用await方法阻塞,等待所有线程都到了栅栏后放开栅栏一起
继续执行。栅栏也被复位以备下次使用;
如果await阻塞超时或是线程被中断,那么就认为栅栏被破坏了。所有阻塞的await会
抛出BrokenBarrierException。
如果成功通过栅栏,那么await会给每个线程发一个唯一的索引号,可以在索引中选一个
领导线程,由它在下一轮中执行一些特殊的工作。
CyclicBarrier的构造函数还可以接收一个Runnable,并在成功通过栅栏时在一个
子任务执行它。但是在线程被释放之前是不能执行的。
以一个细胞游戏为例子,在一个N*N的棋盘上,把整个棋盘分成多个小棋盘并行执行。:
public class CellularAutomata {

	private final Board mainBoard;
	private final CyclicBarrier barrier;
	private final Worker[] workers;

	public CellularAutomata(Board board) {
		this.mainBoard = board;
		int count = Runtime.getRuntime().availableProcessors();
		this.barrier = new CyclicBarrier(count,
				new Runnable() {
					public void run() {
						mainBoard.commitNewValues();
					}});
		this.workers = new Worker[count];
		for (int i = 0; i < count; i++)
			workers[i] = new Worker(mainBoard.getSubBoard(count, i));
	}

	private class Worker implements Runnable {
		private final Board board;

		public Worker(Board board) { this.board = board; }
		public void run() {
			while (!board.hasConverged()) {
				for (int x = 0; x < board.getMaxX(); x++)
					for (int y = 0; y < board.getMaxY(); y++)
						board.setNewValue(x, y, computeValue(x, y));
				try {
					barrier.await();
				} catch (InterruptedException ex) {
					return;
				} catch (BrokenBarrierException ex) {
					return;
				}
			}
		}

		private int computeValue(int x, int y) {
			// Compute the new value that goes in (x,y)
			return 0;
		}
	}

	public void start() {
		for (int i = 0; i < workers.length; i++)
			new Thread(workers[i]).start();
		mainBoard.waitForConvergence();
	}

	interface Board {
		int getMaxX();
		int getMaxY();
		int getValue(int x, int y);
		int setNewValue(int x, int y, int value);
		void commitNewValues();
		boolean hasConverged();
		void waitForConvergence();
		Board getSubBoard(int numPartitions, int index);
	}

}
Callable
Runnable不能有返回值、也不能抛出异常,所以Callable更加好。Callable相当于
可以有返回结果的Runnable。例如一个返回void的Callable就是Callable<void>
。而且Runnable只能抛出非受检查异常,而Callable可以抛出受检查或非受检查异常。
Callable位于java.util.concurrent包下,它也是一个接口,
在它里面也只声明了一个方法,只不过这个方法叫做call():
public interface Callable<V> {
    /**
     * Computes a result, or throws an exception if unable to do so.
     *
     * @return computed result
     * @throws Exception if unable to compute a result
     */
    V call() throws Exception;
}
可以看到,这是一个泛型接口,call()函数返回的类型就是传递进来的V类型。
那么怎么使用Callable呢?一般情况下是配合ExecutorService来使用的,
在ExecutorService接口中声明了若干个submit方法的重载版本:
<T> Future<T> submit(Callable<T> task);
<T> Future<T> submit(Runnable task, T result);
Future<?> submit(Runnable task);
第一个submit方法里面的参数类型就是Callable。
暂时只需要知道Callable一般是和ExecutorService配合来使用的, 具体的使用方法讲在后面讲述。
一般情况下我们使用第一个submit方法和第三个submit方法,第二个submit方法很少使用。
Future
Future就是对于具体的Runnable或者Callable任务的执行结果进行取消、查询是否完成、 获取结果。必要时可以通过get方法获取执行结果,该方法会阻塞直到任务返回结果。
Future提供了三种功能:
- 判断任务是否完成;
- 能够中断任务;
- 能够获取任务执行结果。
Future类位于java.util.concurrent包下,它是一个接口:
public interface Future<V> {
    boolean cancel(boolean mayInterruptIfRunning);
    boolean isCancelled();
    boolean isDone();
    V get() throws InterruptedException, ExecutionException;
    V get(long timeout, TimeUnit unit)
        throws InterruptedException, ExecutionException, TimeoutException;
}
在Future接口中声明了5个方法,下面依次解释每个方法的作用:
-
cancel方法用来取消任务,如果取消任务成功则返回true,如果取消任务失败则返回false。参数mayInterruptIfRunning表示是否允许取消正在执行却没有执行完毕的任务, 如果设置true,则表示可以取消正在执行过程中的任务。-
如果任务已经完成,则无论
mayInterruptIfRunning为true还是false,此方法肯定返回false,即如果取消已经完成的任务会返回false; -
如果任务正在执行,若
mayInterruptIfRunning设置为true,则返回true,若mayInterruptIfRunning设置为false,则返回false; -
如果任务还没有执行,则无论
mayInterruptIfRunning为true还是false,肯定返回true。
-
如果任务已经完成,则无论
-
isCancelled方法表示任务是否被取消成功,如果在任务正常完成前被取消成功,则返回true。 -
isDone方法表示任务是否已经完成,若任务完成,则返回true; -
get()方法用来获取执行结果,这个方法会产生阻塞,会一直等到任务执行完毕才返回; -
get(long timeout, TimeUnit unit)用来获取执行结果,如果在指定时间内,还没获取到结果,就直接返回null。
因为Future只是一个接口,所以是无法直接用来创建对象使用的,因此就有了下面的FutureTask。
FutureTask
FutureTask实现了Future语义,表示一个会有结果的计算。计算过程是通过Callable
接口实现的。FutureTask可以三种状态:
- 等待运行。
- 正在运行。
- 已经完成。
当任务处于完成状态以后就一直停在这个状态了。
我们先来看一下FutureTask的实现:
public class FutureTask<V> implements RunnableFuture<V>
FutureTask类实现了RunnableFuture接口,我们看一下RunnableFuture接口的实现:
public interface RunnableFuture<V> extends Runnable, Future<V> {
    void run();
}
可以看出RunnableFuture继承了Runnable接口和Future接口,而FutureTask实现了RunnableFuture接口。所以它既可以作为Runnable被线程执行,又可以作为Future得到Callable的返回值。
FutureTask提供了2个构造器:
public FutureTask(Callable<V> callable) { }

public FutureTask(Runnable runnable, V result) { }
事实上,FutureTask是Future接口的一个唯一实现类。
Future通过get方法取得计算结果。取结果的行为取决于状态:
-
如果任务已经完成
get会立即返回结果。 - 如果还没有完成就阻塞等待。然后成功返回结果或是抛异常。
FutureTask确保安全地计算结果从执行计算的线程传递到需要结果的线程。
如下面用Future来处理会花费大量时间的数据库访问任务:
public class Preloader {
	ProductInfo loadProductInfo() throws DataLoadException {
		return null;
	}

	private final FutureTask<ProductInfo> future ==
		new FutureTask<ProductInfo>(new Callable<ProductInfo>() {
			public ProductInfo call() throws DataLoadException {
				return loadProductInfo();
			}
		});
	private final Thread thread = new Thread(future);

	public void start() { thread.start(); }

	public ProductInfo get()
			throws DataLoadException, InterruptedException {
		try {
			return future.get();
		} catch (ExecutionException e) {
			Throwable cause = e.getCause();
			if (cause instanceof DataLoadException)
				throw (DataLoadException) cause;
			else
				throw LaunderThrowable.launderThrowable(cause);
		}
	}

	interface ProductInfo { }
}

class DataLoadException extends Exception { }
Callable会抛出异常,并且任何代码都会抛出Error。无论抛出了什么在Future.get
里都会被封装成ExecutionException以及CancellationException。由于这里抛出的
类型都是被作为Throwable返回的,所以处理起来有些复杂:
因为要判断抛出的类型是CheckedException?RuntimeException?还是Error?
如果是我们预想中的DataLoadException,走我们预计的处理方式。其他的可能性用
下面的工具类LaunderThrowable来处理异常。它会把强制把未检查的异常转为
RuntimeException:
public class LaunderThrowable {
	/**
	 * Coerce an unchecked Throwable to a RuntimeException
	 * <p/>
	 * If the Throwable is an Error, throw it; if it is a
	 * RuntimeException return it, otherwise throw IllegalStateException
	 */
	public static RuntimeException launderThrowable(Throwable t) {
		if (t instanceof RuntimeException)
			return (RuntimeException) t;
		else if (t instanceof Error)
			throw (Error) t;
		else
			throw new IllegalStateException("Not unchecked", t);
	}
}
结合Future与CurrentMap实现缓存
先定义一个接口Computable,A为输入类型,V为输出类型。接口方法compute是
计算主逻辑:
public interface Computable<A, V> {
	V compute(A arg) throws InterruptedException;
}
带缓存的计算功能可以实现这个接口。通过CurrentMap的putIfAbsent实现原子性的
「没有则添加」;用Future表示计算正在执行,避免重计算同一个值:
public class Memoizer <A, V> implements Computable<A, V> {
	private final ConcurrentMap<A, Future<V>> cache
			= new ConcurrentHashMap<A, Future<V>>();
	private final Computable<A, V> c;

	public Memoizer(Computable<A, V> c) {
		this.c = c;
	}

	public V compute(final A arg) throws InterruptedException {
		while (true) {
			Future<V> f = cache.get(arg);
			if (f == null) {
				Callable<V> eval = new Callable<V>() {
					public V call() throws InterruptedException {
						return c.compute(arg);
					}
				};
				FutureTask<V> ft = new FutureTask<V>(eval);
				f = cache.putIfAbsent(arg, ft);
				if (f == null) {
					f = ft;
					ft.run();
				}
			}
			try {
				return f.get();
			} catch (CancellationException e) {
				cache.remove(arg, f);
			} catch (ExecutionException e) {
				throw LaunderThrowable.launderThrowable(e.getCause());
			}
		}
	}
}
这样实现的带缓存的计算类可以用在Servlet里:
@ThreadSafe
public class Factorizer extends GenericServlet implements Servlet {
	private final Computable<BigInteger, BigInteger[]> c ==
			new Computable<BigInteger, BigInteger[]>() {
				public BigInteger[] compute(BigInteger arg) {
					return factor(arg);
				}
			};
	private final Computable<BigInteger, BigInteger[]> cache
			= new Memoizer<BigInteger, BigInteger[]>(c);

	public void service(ServletRequest req, ServletResponse resp) {
		try {
			BigInteger i = extractFromRequest(req);
			encodeIntoResponse(resp, cache.compute(i));
		} catch (InterruptedException e) {
			encodeError(resp, "factorization interrupted");
		}
	}

	void encodeIntoResponse(ServletResponse resp, BigInteger[] factors) {
	}

	void encodeError(ServletResponse resp, String errorString) {
	}

	BigInteger extractFromRequest(ServletRequest req) {
		return new BigInteger("7");
	}

	BigInteger[] factor(BigInteger i) {
		// Doesn't really factor
		return new BigInteger[]{i};
	}
}
例子:使用Callable+Future获取执行结果
public class Test {

    public static void main(String[] args) {
        ExecutorService executor = Executors.newCachedThreadPool();
        Task task = new Task();
        Future<Integer> result = executor.submit(task);
        executor.shutdown();

        try {
            Thread.sleep(1000);
        } catch (InterruptedException e1) {
            e1.printStackTrace();
        }

        System.out.println("主线程在执行任务");

        try {
            System.out.println("task运行结果"+result.get());
        } catch (InterruptedException e) {
            e.printStackTrace();
        } catch (ExecutionException e) {
            e.printStackTrace();
        }

        System.out.println("所有任务执行完毕");
    }

}


class Task implements Callable<Integer>{

    @Override
    public Integer call() throws Exception {
        System.out.println("子线程在进行计算");
        Thread.sleep(3000);
        int sum = 0;
        for(int i=0;i<100;i++)
            sum += i;
        return sum;
    }

}
执行结果:
子线程在进行计算
主线程在执行任务
task运行结果4950
所有任务执行完毕
2.使用Callable+FutureTask获取执行结果
public class Test {

    public static void main(String[] args) {
        //第一种方式
        ExecutorService executor = Executors.newCachedThreadPool();
        Task task = new Task();
        FutureTask<Integer> futureTask = new FutureTask<Integer>(task);
        executor.submit(futureTask);
        executor.shutdown();

        //第二种方式,注意这种方式和第一种方式效果是类似的,只不过一个使用的是ExecutorService,一个使用的是Thread
        /*Task task = new Task();
        FutureTask<Integer> futureTask = new FutureTask<Integer>(task);
        Thread thread = new Thread(futureTask);
        thread.start();*/

        try {
            Thread.sleep(1000);
        } catch (InterruptedException e1) {
            e1.printStackTrace();
        }

        System.out.println("主线程在执行任务");

        try {
            System.out.println("task运行结果"+futureTask.get());
        } catch (InterruptedException e) {
            e.printStackTrace();
        } catch (ExecutionException e) {
            e.printStackTrace();
        }

        System.out.println("所有任务执行完毕");
    }

}

class Task implements Callable<Integer>{

    @Override
    public Integer call() throws Exception {
        System.out.println("子线程在进行计算");
        Thread.sleep(3000);
        int sum = 0;
        for(int i=0;i<100;i++)
            sum += i;
        return sum;
    }

}
如果为了可取消性而使用 Future 但又不提供可用的结果,则可以声明Future<?>形式类型、
并返回 null 作为底层任务的结果。
Executor框架
传统任务管理的缺陷
在同一线程中处理所有任务,性能差:
public class SingleThreadWebServer {
	public static void main(String[] args) throws IOException {
		ServerSocket socket = new ServerSocket(80);
		while (true) {
			Socket connection = socket.accept();
			handleRequest(connection);
		}
	}

	private static void handleRequest(Socket connection) {
		// request-handling logic here
	}
}
为每个任务创建一个线程,太浪费资源:
public class ThreadPerTaskWebServer {
	public static void main(String[] args) throws IOException {
		ServerSocket socket = new ServerSocket(80);
		while (true) {
			final Socket connection = socket.accept();
			Runnable task = new Runnable() {
				public void run() {
					handleRequest(connection);
				}
			};
			new Thread(task).start();
		}
	}

	private static void handleRequest(Socket connection) {
		// request-handling logic here
	}
}
用Executor框架
在Java类库中,任务执行的主要抽象是Executor而不是Thread。所以每当看到:
new Thread(runnable).start();
这样的模式时,要考虑用Executor来代替Thread。
Executor接口代表一个任务,要实现的方法execute里是对Runnable对象的调用:
public interface Executor {
	void execute(Runnable command);
}
Executor相当于一个基于生产者-消费者模式的任务队列,分开了任务提交与任务执行
的解耦。用它来实现一个基于线程池的Web服务器:
public class TaskExecutionWebServer {
	private static final int NTHREADS = 100;
	private static final Executor exec
			= Executors.newFixedThreadPool(NTHREADS);

	public static void main(String[] args) throws IOException {
		ServerSocket socket = new ServerSocket(80);
		while (true) {
			final Socket connection = socket.accept();
			Runnable task = new Runnable() {
				public void run() {
					handleRequest(connection);
				}
			};
			exec.execute(task);
		}
	}

	private static void handleRequest(Socket connection) {
		// request-handling logic here
	}
}
重写不同的线程策略
前面说到Executor的接口方法execute:
public interface Executor {
	void execute(Runnable command);
}
可以重写它来实现不同的策略,如:
为每个请求都创建一个线程:
public class ThreadPerTaskExecutor implements Executor {
	void execute(Runnable r) {
		new Thread(r).start();
	}
}
或用同步的方法在当前线程中执行任务:
public class WithinThreadExecutor implements Executor {
	void execute(Runnable r) {
		r.run();
	}
}
不同类型的线程池
前面服务器例子中创建线程池的方法:
Executor pool = Executors.newFixedThreadPool(num);
Executors可以调用不同的工厂方法返回不同的线程池:
newFixedThreadPool:固定长度。如果有线程因异常结束会补充一个新的。
newCachedThreadPool:可缓存。按需要回收空闲线程或添加新线程,并且不限制线程池
规模。
newSingleThreadExecutor:单线程的Executor。一个线程因为异常结束再建一个来
替换它。能保证依照任务顺序执行。还保证前一个任务的内存操作对下一个任务是
可见的。
newScheduledThreadPool:固定长度,并像Timer可以执行计划任务。
Executor生命周期
因为是异步的,所以提供了管理生命周期的工具ExecutorService,它继承了Executor
,并添加了控制生命周期的方法。
当ExecutorService关闭后,再提交任务会被抛弃,或使execute方法抛出未检查异常
RejectedExecutionException。
public interface ExecutorService Extends Executor {

	/* 平缓关闭,不接新任务,等待已经加入的任务完成 *;
	void shutdown();

	/* 强关,停止所有正在运行的任务 */
	List<Runnable> shutdownNow();

	/* 可用来轮询是否终止 */
	boolean isShutdown();

	boolean isInited();


	boolean awaitTermination(long timeout, TimeUnit unit)
		throws InterruptedException;
	// ... 其他方法
}
支持关闭操作的web服务器例子。不断地处理请求,有一个特殊的请求是关机,读到它就 关掉:
public class LifecycleWebServer {
	private final ExecutorService exec = Executors.newCachedThreadPool();

	public void start() throws IOException {
		ServerSocket socket = new ServerSocket(80);
		while (!exec.isShutdown()) {
			try {
				final Socket conn = socket.accept();
				exec.execute(new Runnable() {
					public void run() {
						handleRequest(conn);
					}
				});
			} catch (RejectedExecutionException e) {
				if (!exec.isShutdown())
					log("task submission rejected", e);
			}
		}
	}

	public void stop() {
		exec.shutdown();
	}

	private void log(String msg, Exception e) {
		Logger.getAnonymousLogger().log(Level.WARNING, msg, e);
	}

	void handleRequest(Socket connection) {
		Request req = readRequest(connection);
		if (isShutdownRequest(req))
			stop();
		else
			dispatchRequest(req);
	}

	interface Request {
	}

	private Request readRequest(Socket s) {
		return null;
	}

	private void dispatchRequest(Request r) {
	}

	private boolean isShutdownRequest(Request r) {
		return false;
	}
}
延时任务与周期任务
传统方案的不足
Timer方案的不足
Timer方案有缺点,因为执行的时候只创建一个线程。前一个任务时间长了会影响后面
任务的时间精确性。而且如果TimerTask抛出未检查异常中断了任务Timer也不会恢复
执行。
可以使用阻塞队列DelayQueue,它为ScheduledThreadPoolExecutor提供了调度功能。
DelayQueue里管理一组Delayed对象,每个都对应一个时间延迟。在DelayQueue里
只有某个元素逾期后才能从DelayQueue中执行take操作。DelayQueue中的对象按
延迟时间排序。
忙等待方案
public void loopTask() {
	while (flag) {
		doSomething();
		sleep(100);
	}
}
- 这样的任务,每启动一个实例,就会有一个线程。操作系统最大线程数是有限的。
-
注意
sleep(100),占用了一个线程,大部分时间不害休眠状态。
周期性任务线程池
ScheduledThreadPoolExecutor适合执行周期性任务。注意要用static final修饰才能
由多个线程共享:
private static final ScheduledExecutorService timer =
	Executors.newScheduledThreadPool(10);
成员方法scheduleAtFixedRate(runnable)接收任务,执行间隔等设置:
private void init() {
	replenishTask = timer.scheduleAtFixedRate(
		new Runnable() {
			public void run() {
				// do something...
			}
		}, 0, 1, TimeUnit.SECONDS);
}
注意任务要处理掉异常,因为如果有异常抛出的话会中断周期任务。
ScheduledExecutorService.shutdown()关闭线程池。但是要注意已经启动的线程停不
下来。所以在创建线程池时指定线程的构造器让创建出来的线程都是守护线程:
import java.util.concurrent.ThreadFactory;

private static final ScheduledExecutorService Timer ==
	Executors.newScheduledThreadPool(10, ThreadFactory() {
		public Thread newThread(Runnable runnable) {
			Thread thread = new Thread(runnable);
			thread.setDaemon(true);
			return thread;
		}
	});
设计并行程序
之前已经说过Callable比Runnable好:可以有返回值还可以抛出受检查异常。
public interface Callable<V> {
	V call() throws Exception;
}
Runnable和Callable都是对任务的抽象。在Executor框架中执行任务有四个阶段:
创建、提交、开始、完成。Executor框架中可以取消一个已经提交但是还没有开始执行
的任务;对于已经在执行的任务只能让它响应中断时才能取消。
Future表示一个任务的使命周期,并提供方法来判断是否已经完成或取消,以及取得
执行结果和取消任务。当一个Future执行完成以后,它就永远停在完成状态上。
public interface Future<V> {
	boolean cancel(boolean mayInterruptIfRunning);
	boolean isCancelled();
	boolean isDone();

	V get() throws InterruptedException, ExecutionException,
		CancellationException;

	V get(long timeout, TimeUnit unit) throws InterruptedException,
		ExecutionException, CancellationException, TimeoutException;
}
有多个方法来创建Future:
ExecutorService中的submit方法以Runnable或Callable对象提交给Executor,
从而创建一个Future。可以用这个Future来执行任务或取消任务。
还可以显式地为某个Runnalbe或Callable实例化一个FutureTask。由于FutureTask
实现了Runnable,所以可以拿它提交给Executor来执行,或是直接调用它的run方法
。
从Java 6开始ExecutorService实现可以改写AbstractExecutorService中的
newTaskFor 方法从而根据已经提交的Runnable或Callable来控制Future的实例化
过程。在现有的默认的实现中,仅仅是创建了一个新的FutureTask:
protected <T> RunnableFuture<T> newTaskFor(Callable<T> task) {
	return new FutureTask<T>(task);
}
在Runnable或Callable提交到Executor过程中是安全传递的,不会有等到构造了一半
的情况发生;把Future传递给其他线程也是安全的,所以在其他线程中可以放心使用
get方法取结果。
拆分任务并行执行
以一个渲染网页程序为例子:渲染页面文字与下载页面上的图片这两种工作可以并行执行, 而且因为一个是CPU密集一个是IO密集,即使在单核CPU上性能提升也很明显:
把下载任务做成Callable传递给ExecutorService。当主任务要图片时会等
Future.get返回结果。当收到中断异常时,中断当前线程并退出。
public abstract class FutureRenderer {
	private final ExecutorService executor = Executors.newCachedThreadPool();

	void renderPage(CharSequence source) {
		final List<ImageInfo> imageInfos = scanForImageInfo(source);
		Callable<List<ImageData>> task ==
				new Callable<List<ImageData>>() {
					public List<ImageData> call() {
						List<ImageData> result = new ArrayList<ImageData>();
						for (ImageInfo imageInfo : imageInfos)
							result.add(imageInfo.downloadImage());
						return result;
					}
				};

		Future<List<ImageData>> future = executor.submit(task);
		renderText(source);

		try {
			List<ImageData> imageData = future.get();
			for (ImageData data : imageData)
				renderImage(data);
		} catch (InterruptedException e) {
			// Re-assert the thread's interrupted status
			Thread.currentThread().interrupt();
			// We don't need the result, so cancel the task too
			future.cancel(true);
		} catch (ExecutionException e) {
			throw launderThrowable(e.getCause());
		}
	}

	interface ImageData {
	}

	interface ImageInfo {
		ImageData downloadImage();
	}

	abstract void renderText(CharSequence s);

	abstract List<ImageInfo> scanForImageInfo(CharSequence s);

	abstract void renderImage(ImageData i);
}
上面的任务虽然很好地把CPU密集任务和IO密集任务分开了,这属于异构任务并行化。这样 的是很难确定这两边的任务负载是一样的。可能有一边很轻,马上就完成了,另一边还在 执行。所以很难保证效率提高了多少。
只有相互独立的同构任务可以并发处理时,才能体现出明显的提升。
CompletionService与BlockingQueue
在身Executor提交了一组任务,可以用保留与每个任务相关的Future,反复调用get
方法,同时设参数timeout为0。这种轮询的方式虽然有用,但可以用更好的方法:
完成服务CompletionServise。
CompletionServise相当组合了Executor与BlockingQueue。可以把Callable任务
交给它执行,然后用类似于队列操作的take和pall等方法取结果。已经完成的结果被
封装为Future。
CompletionServise有一个实现类ExecutorCompletionService,可以把计算部分委托
给Executor。它的实现非常简单。在构造函数中创建一个BlockingQueue来保存计算
结果。当计算完成后,调用FutureTask中的done方法。当提交某个任务时,该任务
首先被包装为一个QueueingFuture,这是FutureTask的子类,然后改写dome方法,
并将结果存入BlockingQueue中。如下面代码,take和poll方法委托给了
BlockingQueue,这些方法会在得出结果前阻塞。
private class QueueingFuture<V> extends FutureTask<V> {
	QueueingFuture(Callable<V> c) { super(c); }
	QueueingFuture(Runnable t, V r) { super(t, r); }

	protected void done() {
		completionQueue.add(this);
	}
}
使用CompletionService的例子。主要强化在两个地方:
- 为每张图片建立一个独立的任务,并在线程池中启动它们。这样下载变成并行任务。
-
从
CompletionService中取得的结果是下载完立即显示出来。
public abstract class Renderer {

	private final ExecutorService executor;

	Renderer(ExecutorService executor) {
		this.executor = executor;
	}

	void renderPage(CharSequence source) {
		final List<ImageInfo> info = scanForImageInfo(source);

		CompletionService<ImageData> completionService ==
				new ExecutorCompletionService<ImageData>(executor);

		for (final ImageInfo imageInfo : info)
			completionService.submit(new Callable<ImageData>() {
				public ImageData call() {
					return imageInfo.downloadImage();
				}
			});

		renderText(source);

		try {
			for (int t = 0, n = info.size(); t < n; t++) {
				Future<ImageData> f = completionService.take();
				ImageData imageData = f.get();
				renderImage(imageData);
			}
		} catch (InterruptedException e) {
			Thread.currentThread().interrupt();
		} catch (ExecutionException e) {
			throw launderThrowable(e.getCause());
		}
	}

	interface ImageData {
	}

	interface ImageInfo {
		ImageData downloadImage();
	}

	abstract void renderText(CharSequence s);

	abstract List<ImageInfo> scanForImageInfo(CharSequence s);

	abstract void renderImage(ImageData i);

}
多个ExecutorCompletionService可以共享一个Executor,所以可以创建一个特定的
Executor来计算私有任务,还可以能共享一个公共Executor的
ExecutorCompletionService。所以CompletionService的作为就相当于一组计算的句柄
,这与Future作为单个计算的够本是类似的。通过记录提交给CompletionService任务
的数量,并计算出已经获得的已经完成结果数量,即使使用一个共享的Executor也可以
知道已经获得了所有任务结果的时间。
设置任务的执行时限
Future.get中可以设定超时限制,超时后抛出TimeoutException。一般在任务超时后
应该立即Future.cancel(true)停止,从而避免继续计算一个不能再用的结果而浪费计算
资源。如果编写的任务是可以取消的,可以提前中止它,防止消耗资源。
例子:从广告服务器上取广告。把广告任务交给Executor。如果超时就取消任务:
Page renderPageWithAd() throws InterruptedException {
	long endNanos = System.nanoTime() + TIME_BUDGET;
	Future<Ad> f = exec.submit(new FetchAdTask());
	// Render the page while waiting for the ad
	Page page = renderPageBody();
	Ad ad;
	try {
		// Only wait for the remaining time budget
		long timeLeft = endNanos - System.nanoTime();
		ad = f.get(timeLeft, NANOSECONDS);
	} catch (ExecutionException e) {
		ad = DEFAULT_AD;
	} catch (TimeoutException e) {
		ad = DEFAULT_AD;
		f.cancel(true);
	}
	page.setAd(ad);
	return page;
}
超时任务还可以扩展到多个任务的情况。创建n个任务,提交到一个线程池,保留n个
Future。除了用Future.get方法一个一个取结果,还可以用一组任务为参数直接调用
invokeAll方法,按任务集合中迭代器顺序把所有的Future添加到返回集合中。这样
每个Future与对应的Callable关联起来了。所有任务都完毕或是超时以后invokeAll
方法将返回。可以用get方法或isCancelled方法来判断每个任务是否完成。
private class QuoteTask implements Callable<TravelQuote> {
	private final TravelCompany company;
	private final TravelInfo travelInfo;
	...
	public TravelQuote call() throws Exception {
		return company.solicitQuote(travelInfo);
	}
}

public List<TravelQuote> getRankedTravelQuotes( TravelInfo travelInfo,
		Set<TravelCompany> companies, Comparator<TravelQuote> ranking,
		long time, TimeUnit unit) throws InterruptedException
{
	List<QuoteTask> tasks = new ArrayList<QuoteTask>();

	for (TravelCompany company : companies)
		tasks.add(new QuoteTask(company, travelInfo));

	List<Future<TravelQuote>> futures = exec.invokeAll(tasks, time, unit);
	List<TravelQuote> quotes = new ArrayList<TravelQuote>(tasks.size());
	Iterator<QuoteTask> taskIter = tasks.iterator();

	for (Future<TravelQuote> f : futures) {
		QuoteTask task = taskIter.next();
		try {
			quotes.add(f.get());
		} catch (ExecutionException e) {
			quotes.add(task.getFailureQuote(e.getCause()));
		} catch (CancellationException e) {
			quotes.add(task.getTimeoutQuote(e));
		}
	}
	Collections.sort(quotes, ranking);

	return quotes;
}
取消、关闭任务与线程
Java没有提供安全终止线程的机制,Thread的stop与suspend等方法会有一些缺陷,
应该避免使用。推荐让一个线程调用中断来停止另一个线程。
取消或中断任务
取消任务
使用volatile的标记是否继续执行,公开方法cancel来修改标志位:
@ThreadSafe
public class PrimeGenerator implements Runnable {
	private static ExecutorService exec = Executors.newCachedThreadPool();

	@GuardedBy("this")
	private final List<BigInteger> primes = new ArrayList<BigInteger>();

	private volatile boolean cancelled;

	public void run() {
		BigInteger p = BigInteger.ONE;
		while (!cancelled) {
			p = p.nextProbablePrime();
			synchronized (this) {
				primes.add(p);
			}
		}
	}

	public void cancel() {
		cancelled = true;
	}

	public synchronized List<BigInteger> get() {
		return new ArrayList<BigInteger>(primes);
	}
}
这是一种等等取消的策略,如果计算操作被阻塞的话,可能永远也不会检查到标志位。
中断任务
Thread类中的相关方法:
public class Thread {

	/* 中断线程 */
	public void interrupt() { ... }

	/* 查看线程的中断状态 */
	public boolean isInterrupted() { ... }

	/* 静态方法,清除本线程的中断状态。注意不是目标线程
	   而是本线程 */
	public static boolean interrupted() { ... }

	...
}
在阻塞情况下被中断:
阻塞库方法,如Thread.sleep和Object.wait都会检查线程中断,在中断时返回。中断
时执行的操作有:清除中断状态,抛出InterruptedException表示任务提前结束。JVM
不保证阻塞方法检查到中断的速度,但其实还是挺快的。
在非阻塞情况下被中断:
非阻塞情况下被中断,它的中断状态会被设置,然后根据被取消的操作来检查中断状态以
判断发生了中断。这样如果不触发InterruptedException中断状态会一直保持,赶到明确
清除了中断状态。
调用interrupt方法只是发出一个请示。所以目标线程一定要处理中断异常,不然线程就
中断不了。
在调用静态的interrupted方法时一定要小心,因为它在返回了当前线程的中断状态同时
还会清除,所以如果返回了true就一定要处理,不然就丢失了一次中断请求。如下面的
代码地检查到有请求中断时马上中断当前任务:
class PrimeProducer extends Thread {
	private final BlockingQueue<BigInteger> queue;

	PrimeProducer(BlockingQueue<BigInteger> queue) {
		this.queue = queue;
	}

	public void run() {
		try {
			BigInteger p = BigInteger.ONE;
			while (!Thread.currentThread().isInterrupted())
			queue.put(p = p.nextProbablePrime());
		} catch (InterruptedException consumed) {
			/* Allow thread to exit */
		}
	}

	public void cancel() { interrupt(); }
}
中断策略
收到中断请求并不是说一定要马上处理,可以完成当前任务或是再加些善后,在合适的时候 再向上抛出中断异常、或其他方式表达已经收到中断请示。
当前任务并不一定是在一个独立的线程里运行,有可以和其他任务一起是一个串型的单线程 ,也有可能是一个线程池里。所以一般业务逻辑代码收到了中断请求以后只向外抛中断异常 。让调用都或外部容器来进一步的操作。
执行的任务应该保存执行线程的中断状态,如果除了把InterruptedException传递给调用
者外还要有其他的操作,那么应该在捕获InterruptedException后恢复中断状态,即用
interrupt方法中断当前的线程:
Thread.currentThread().interrupt();
响应中断
在阻塞函数调用时,处理中断的两种基本策略:
- 传递异常(可以在完成任务或善后),这样本方法也成了可中断的方法。
- 恢复中断状态,从而使调用栈中的上层代码可以对其进行处理。
继续抛出异常,可以只是简单地抛出:
BlockingQueue<Task> queue;
...

public Task getNextTask() throws InterruptedException {
	return queue.take();
}
对于不支持取消但仍可以调用中断阻塞方法的操作,在忙等待检查中应该在本地保存中断
状态。因为大多数阻塞方法在入口处检查中断状态,在遇到中断时抛出
InterruptedException。
下面的代码用interrupted标记是正常完成还是被中断,如果是被中断的要恢复中断状态:
public Task getNextTask(BlockingQueue<Taskgt; queue) {
	boolean interrupted = false;
	try {
		while (true) {
			try {
				return queue.take();
			} catch (InterruptedException e) {
				interrupted = true;
				// 继续循环,但记录下被中断过
			}
		}
	} finally {
		if (interrupted)
			Thread.currentThread().interrupt(); // 恢复线程的状态是中断的
	}
}
如果代码不会调用可中断的阻塞方法,那么还是可以通过任务代码中轮询当前线程中断状态 的方式来响应中断。
通过Future来实现取消
Future.cancel(boolean)设置任务是否可以检测到中断请求。下面的代码在超时后取消
那些不再需要结果的任务:
public static void timedRun(Runnable r, long timeout, TimeUnit unit)
	throws InterruptedException
{
	Future<?> task = taskExec.submit(r);
	try {
		task.get(timeout, unit);
	} catch (TimeoutException e) {
		// 如果是因为超时,接下来的任务都被取消
	} catch (ExecutionException e) {
		//  如果是任务逻辑中的异常,继续抛出
		throw launderThrowable(e.getCause());
	} finally {
		// 已经结束,执行取消也不会有坏处
		task.cancel(true); // 如果任务正在运行,就会被中断
	}
}
当Future.get抛出中断异常或超时异常后,如果确定不再需要结果,那可以用
Future.cancel取消任务。
处理不可中断的阻塞
像是IO这样的阻塞操作提前返回或抛出中断异常来响应中断请求。如Socket IO的或内部锁
阻塞时被调用interrupte方法只设置线程中断状态,没有其他效果。所以对于不同的情况
要有不同的方法:
java.io包中的Socket IO。可以通过关闭Socket,让read或write等阻塞方法抛出
SocketException。
java.io包中的同步IO。InterruptibleChannel上阻塞的线程可以被中断并抛出
ClosedByInterruptException并关闭链路,还会引起同一链路上阻塞的其他线程同样抛出
ClosedByInterruptException。当关闭一个InterruptibleChannel时,阻塞在同一链路
上的所有阻塞线程抛出AsynchronousClosedException。
Selector的异步IO。因为Selector.select方法阻塞了,调用close或wakeup方法
会抛出ClosedSelectorException并提前返回。
内置锁。内置锁无法中断,推荐改用显式锁。
一个中断Socket连接的例子,重写了interrupt方法。在方法里关闭了连接并调用超类的
interrupt方法:
public class ReaderThread extends Thread {

	private final Socket socket;

	// ...

	public ReaderThread(Socket socket) throws IOException {
		this.socket = socket;
		this.in = socket.getInputStream();
	}

	// ...

}
newTaskFor封装非标准的取消
Java 6在ThreadPoolExecutor中增加了newTaskFor工厂方法,创建的代表任务的
Future对象。newTaskFor方法还能返回扩展Future和Runnable接口,并由
FutureTask实现的RunnableFuture接口。
下面的例子里我们定义了一个CancellableTask接口继承自Callable,它有cancel
方法和newTask工厂方法来创造RunnableFuture。CancellingExecutor继承自
ThreadPoolExecutor,并通过重写newTaskFor让CancellableTask可以创建自己的
Future:
// 任务
public interface CancellableTask<T> extends Callable<T> {
	void cancel();
	RunnableFuture<T> newTask();
}

/* 线程池 */
@ThreadSafe
public class CancellingExecutor extends ThreadPoolExecutor {
	...
	protected<T> RunnableFuture<T> newTaskFor(Callable<T> callable) {
		if (callable instanceof CancellableTask)
			return ((CancellableTask<T>) callable).newTask();
		else
			return super.newTaskFor(callable);
	}
}

public abstract class SocketUsingTask<T> implements CancellableTask<T> {
	@GuardedBy("this")
	private Socket socket;

	protected synchronized void setSocket(Socket s) {
		socket = s;
	}

	public synchronized void cancel() {
		try {
			if (socket != null)
			socket.close();
		} catch (IOException ignored) {
		}
	}

	public RunnableFuture<T> newTask() {
		return new FutureTask<T>(this) {
			public boolean cancel(boolean mayInterruptIfRunning) {
				try {
					SocketUsingTask.this.cancel();
				} finally {
					return super.cancel(mayInterruptIfRunning);
				}
			}
		};
	}

}
停止基于线程的服务
除了任务需要停止以外,还有很多为支持线程与任务提供的服务也需要停止,如线程池、 任务队列等……
由于线程的所有权是不可传递的,所以对于这些服务来说,应该通过它们自身生命周期方法 来停止它们。
对于设计服务的开发人员来说,如果这个服务存在的时间长于线程的方法存在的时间,就要 为这个服务提供生命周期方法。
注意事项
关闭一个服务不能仅仅中断服务的线程,还要考虑到服务中下执行到一半的任务等事项, 还有任务的阻塞状态。
关闭ExecutorService
成员方法shutdown与shutdownNow。
毒丸项目
队列中一个特殊的成员,读到就表示应该停止了。
只执行一次的服务
服务要处理一批任务,当所有任务都处理完成后结束。这时可以用一个私有的Executor来
简化服务的生命周期管理,因为这个Executor的生命周期被限制于这个方法的调用。
下面的例子在多台主机上并行检查邮件。它创建一个私有的Executor,给每个主机提交
任务,任务全完成以后关闭Executor并等待结束。
注意这里hasNewMail标记的类型是final AtomicBoolean而不是volatile boolean
是因为必须是final的,不然内部类访问不到。
public class CheckForMail {

	public boolean checkMail(Set<String> hosts, long timeout, TimeUnit unit)
			throws InterruptedException
	{
		ExecutorService exec = Executors.newCachedThreadPool();

		final AtomicBoolean hasNewMail = new AtomicBoolean(false);
		try {
			for (final String host : hosts)
				exec.execute(new Runnable() {
					public void run() {
						if (checkMail(host))
							hasNewMail.set(true);
					}
				});
		} finally {
			exec.shutdown();
			exec.awaitTermination(timeout, unit);
		}
		return hasNewMail.get();
	}

	private boolean checkMail(String host) {
		// Check for mail
		return false;
	}
}
记录关闭时的状态
ExecutorService的shutdownNow把强制关掉正执行中的任务。下面实现的强化类
TrackingExecutor记录那些任务是已经开始但学没有正常完成的,在Executor结束后
可以通过getCanceledTasks方法取得还没有执行的任务。注意为了生效返回时一定要维持
线程的中断状态:
public class TrackingExecutor extends AbstractExecutorService {
	private final ExecutorService exec;
	private final Set<Runnable> tasksCancelledAtShutdown ==
			Collections.synchronizedSet(new HashSet<Runnable>());

	public List<Runnable> getCancelledTasks() {
		if (!exec.isTerminated())
			throw new IllegalStateException(/*...*/);
		return new ArrayList<Runnable>(tasksCancelledAtShutdown);
	}

	public void execute(final Runnable runnable) {
		exec.execute(new Runnable() {
			public void run() {
				try {
					runnable.run();
				} finally {
					if (isShutdown()
							&& Thread.currentThread().isInterrupted())
						tasksCancelledAtShutdown.add(runnable);
				}
			}
		});
	}

	public TrackingExecutor(ExecutorService exec) {
		this.exec = exec;
	}

	public void shutdown() {
		exec.shutdown();
	}

	public List<Runnable> shutdownNow() {
		return exec.shutdownNow();
	}

	public boolean isShutdown() {
		return exec.isShutdown();
	}

	public boolean isTerminated() {
		return exec.isTerminated();
	}

	public boolean awaitTermination(long timeout, TimeUnit unit)
			throws InterruptedException {
		return exec.awaitTermination(timeout, unit);
	}


}
在一个爬虫程序上应用上面TrackingExecutor的例子:
public abstract class WebCrawler {

	private class CrawlTask implements Runnable {
		private final URL url;

		CrawlTask(URL url) {
			this.url = url;
		}

		public void run() {
			for (URL link : processPage(url)) {
				if (Thread.currentThread().isInterrupted())
					return;
				submitCrawlTask(link);
			}
		}

		private int count = 1;

		boolean alreadyCrawled() {
			return seen.putIfAbsent(url, true) != null;
		}

		void markUncrawled() {
			seen.remove(url);
			System.out.printf("marking %s uncrawled%n", url);
		}


		public URL getPage() {
			return url;
		}
	}

	private volatile TrackingExecutor exec;
	@GuardedBy("this")
	private final Set<URL> urlsToCrawl = new HashSet<URL>();

	private final ConcurrentMap<URL, Boolean> seen =
		new ConcurrentHashMap<URL, Boolean>();

	private static final long TIMEOUT = 500;
	private static final TimeUnit UNIT = MILLISECONDS;

	protected abstract List<URL> processPage(URL url);

	public WebCrawler(URL startUrl) {
		urlsToCrawl.add(startUrl);
	}

	public synchronized void stop() throws InterruptedException {
		try {
			saveUncrawled(exec.shutdownNow());
			if (exec.awaitTermination(TIMEOUT, UNIT))
				saveUncrawled(exec.getCancelledTasks());
		} finally {
			exec = null;
		}
	}

	public synchronized void start() {
		exec = new TrackingExecutor(Executors.newCachedThreadPool());
		for (URL url : urlsToCrawl) submitCrawlTask(url);
		urlsToCrawl.clear();
	}

	private void saveUncrawled(List<Runnable> uncrawled) {
		for (Runnable task : uncrawled)
			urlsToCrawl.add(((CrawlTask) task).getPage());
	}

	private void submitCrawlTask(URL u) {
		exec.execute(new CrawlTask(u));
	}

}
TrackingExecutor中存在一个不可避免的竞争条件:在线程池关闭时可能会有已经完成的
任务还是处于中断列表里没有更新。对于幂等操作这问题不大,但对于不可重复执行操作
会引发问题。
程序异常终止
线程API中UncaughExceptionHandler处理抛出的异常。防止任务中抛出了未捕获的异常,
而会影响到整个线程。这个接口很简单:
public interface UncaughtExceptionHandler {
	void uncaughtException(Thread t, Throwable e);
}
可以实现接口来处理没有被捕获的异常,最简单的方式就是写日志:
public class UEHLogger implements Thread.UncaughtExceptionHandler {
	public void uncaughtException(Thread t, Throwable e) {
		Logger logger = Logger.getAnonymousLogger();
		logger.log(Level.SEVERE,
			"Thread terminated with exception: " + t.getName(), e);
	}
}
要为线程池中所有线程设置一个UncaughExceptionHandler,需要为
ThreadPoolExecutor 的构造函数提供一个ThreadFactory(和所有的线程一样,只有
线程的所有都能改变线程的UncaughExceptionHandler)。
注意只有execute方法提交的任务才能把它抛出的异常交给处理器;submit提交的任务
无论是抛出的未检查异常还是受检查异常都被认为是任务返回状态的一部分由Future.get
封装在ExecutionException中重新抛出。
JVM关闭
正常关闭:
- 最后一个非守护进程结束。
-
调用
System.exit()方法。 -
被操作系统
SIGINT信号或Control-C
非正常关闭:
-
Runtime.halt -
被操作系统
SIGINT(被KILL掉)
关闭钩子
正常关闭时会调用关闭钩子,即通过Runtime.addShutdownHook方法注册的但还没有开始
的线程。钩子会并发挂靠,所以JVM不能保证钩子调用的顺序。所有钩子都执行完后如果
funFinalizersOnExit为true则JVM将运行终结器(垃圾回收器调用类的finalize
方法)。
钩子不应该对当前程序的状态做任何假设,如假设线程池是否已经关闭等。应该尽快做收尾 工作。
例:一个停止日志服务的钩子程序:
public void start() {
	Runtime.getRuntime().addShutdownHook(new Thread() {
		public void run() {
			try { LogService.this.stop(); }
			catch (InterruptedException ignored) {}
		}
	});
}
守护进程
普通进程如果还没有执行完JVM是关不掉的;守护进程会随JVM关闭而关掉,是连finilly
块都不执行、连回卷栈操作也不执行,直接就关掉了。所以当心不是什么服务都可以作为
守护进程的。
终结器(finallyze方法)
它的目的是清理资源,但是由于它的任何状态都可以被多个线程访问,而且不能保证什么
时候被调用或是会不会被调用。所以清理工作还是及时放在finally块中早点做掉保险。
线程池的使用
任务与执行策略之间的隐性耦合
Executor框架可以分开提交任务与处理任务的耦合。但任务之间的耦合还是要注意。
ThreadPoolExecutor
一般由Executors的工厂方法newCachedThreadPool、newFixedThreadPool、
newScheduledThreadExecutor产生。一般用newCachedThreadPool有比较泛用的配置。
如果产生的默认配置不能满足需求,还可以用它的构造函数定制一个出来:
public ThreadPoolExecutor(int corePoolSize, int maximumPoolSize,
	long keepAliveTime, TimeUnit unit,
	BlockingQueue<Runnable> workQueue, ThreadFactory threadFactory,
	RejectedExecutionHandler handler)
{
	// ...
}
设置线程池大小
核心大小与最大大小设置了一开始的大小和最大小,存在时间表示一定时间内没有任务就 代表这个线程可以被回收掉,如果在当前线程池的大小已经超过核心大小那么这些标记的 线程就会被回收。
newfixedThreadPool方法创建的线程池不会超时;newCachedThreadPood创建的线程池
最大是Integer.MAX_VALUE,而基本大小是0,超时是1分钟。
配置任务队列
单线程的Executor不会有并发任务,它通过线程封闭来实现线程安全性。但在并发线程池
中会有多个并发任务。请求速度超过处理速度时即使把任务放在队列里,没有运行不占用
线程资源,也可能因为队列太大而耗尽资源。
ThreadPoolExecutor的构造函数可能接收一个BlockingQueue来作为任务队列。基本有
三种方案:
- 无限队列。
- 有限队列。
- 同步移交(Synchronous Handoff)。
无限队列是newFixedThreadPool和newSingleThreadExecutor默认的。一般用一个不
限制长度的LinkedBlockingQueue来实现。
有限的队列可以用ArrayBlockingQueue、限制长度的LinkedBlockingQueue或
PriorityBlockingQueue配合相应的满策略。
同步移交应用于非常大的或者无限的线程池,可以通过SynchronousQueue来实现。它并不
是真的队列,仅仅是一个从生产者转到消费者的移交机制。相当于一个没有长度的队列,
要把一个元素放入它,就一定要有一个空闲的线程在等待。如果没有线程等待,而且线程池
已经满任务会被拒绝。只有在线程池是有界的并且可以拒绝任务时,同步移交才有价值。
PriorityBlockingQueue对于任务的优先级有排序,要实现Comparable接口。
- 任务独立性
只有任务是相互独立的才能用有限制的队列,不然所依赖的任务进不了队列执行不了就
锁死了。这时应该用无界的线程池,如newCachedThreadPool。
饱和策略
ThreadPoolExecutor的饱合策略可以通过setRejectedExecutionHandler来修改。
-
Abort:抛未检查异常,调用者处理异常。 -
Discard:丢掉任务。 -
DiscardOlds:丢掉最老的任务。 -
DiscardPolicy:丢掉优先级最低的。 -
Caller_Runs:不抛异常,退回给调用者。用一个execute()执行它。
Caller_Runs不抛弃任务也不抛异常,而是在一个execute()执行它。相当于让调用者
执行,这样调用都就花时间执行任务而暂缓提交新任务了。
下面是一个例子,线程池用CallerRuns策略,调用者中用信号量来限制任务产生量:
ThreadPoolExecutor executor = new ThreadPoolExecutor(N_THREADS, N_THREADS,
			0L, TimeUnit.MILLISECONDS,
			new LinkedBlockingQueue<Runnable>(CAPACITY));

executor.setRejectedExecutionHandler(
		new ThreadPoolExecutor.CallerRunsPolicy() );
调用者中:
@ThreadSafe
public class BoundedExecutor {
	private final Executor exec;
	private final Semaphore semaphore;

	public BoundedExecutor(Executor exec, int bound) {
		this.exec = exec;
		this.semaphore = new Semaphore(bound);
	}

	public void submitTask(final Runnable command)
		throws InterruptedException
	{
		semaphore.acquire();
		try {
			exec.execute(new Runnable() {
					public void run() {
					try {
						command.run();
					} finally {
						semaphore.release();
					}
				}
			});
		} catch (RejectedExecutionException e) {
			semaphore.release();
		}
	}

}
线程工厂
还可以指定线程池创建线程的工厂方法。比如想要让创建的线程是守护线程、给每个创建
的线程指定UncaughtExceptionHandler等需求。工厂方法的接口如下:
public interface ThreadFactory {
	Thread newThread(Runnable r);
}
自定义一个工厂方法的例子,这个工厂和产生的线程有名字,可以用来日志跟踪:
public class MyThreadFactory implements ThreadFactory {
	private final String poolName;

	public MyThreadFactory(String poolName) {
		this.poolName = poolName;
	}

	public Thread newThread(Runnable runnable) {
		return new MyAppThread(runnable, poolName);
	}
}
注意创建的线程也是自定义的,带有名字:
public class MyAppThread extends Thread {
	public static final String DEFAULT_NAME = "MyAppThread";
	private static volatile boolean debugLifecycle = false;
	private static final AtomicInteger created = new AtomicInteger();
	private static final AtomicInteger alive = new AtomicInteger();
	private static final Logger log = Logger.getAnonymousLogger();

	public MyAppThread(Runnable r) {
		this(r, DEFAULT_NAME);
	}

	public MyAppThread(Runnable runnable, String name) {
		super(runnable, name + "-" + created.incrementAndGet());
		setUncaughtExceptionHandler(
			new Thread.UncaughtExceptionHandler() {
				public void uncaughtException(Thread t, Throwable e) {
					log.log(Level.SEVERE, "UNCAUGHT in thread " + t.getName(), e);
				}
		});
	}

	public void run() {
		// Copy debug flag to ensure consistent value throughout.
		boolean debug = debugLifecycle;
		if (debug) log.log(Level.FINE, "Created " + getName());
		try {
			alive.incrementAndGet();
			super.run();
		} finally {
			alive.decrementAndGet();
			if (debug) log.log(Level.FINE, "Exiting " + getName());
		}
	}

	public static int getThreadsCreated() {
		return created.get();
	}

	public static int getThreadsAlive() {
		return alive.get();
	}

	public static boolean getDebug() {
		return debugLifecycle;
	}

	public static void setDebug(boolean b) {
		debugLifecycle = b;
	}
}
如果要在程序中利用安全策略来控制对某些特殊代码库的访问权限。可以通过Executor
中的privilegedThreadFactory工厂来定制自己的线程工厂。所创建的线程与创建这个
privilegedThreadFactory的线程有同样的访问权限、AccessControlContext和
conextClassLoader。如果不用privilegedThreadFactory线程池创建的线程将从在需要
新线程时调用execute或submit的客户程序中继承访问权限。
设置现有的ThreadPoolExecutor
现有的线程池不能随便改:
ExecutorService exec = Executors.newCachedThreadPool();
if (exec instanceof ThreadPoolExecutor)
	((ThreadPoolExecutor) exec).setCorePoolSize(10);
else
	throw new AssertionError("Oops, bad assumption");
Executors中有一个unconfigurableExecutorService工厂方法,它把现有的
ExecutorService包装成了别的东西,只暴露出了ExecutorService方法。
newSingleThreadExecutor创建的结果就是这样封装过的,因为要的就是单线程的,不能
让别人改成多线程的。
你也可以在自己的Executor中使用这种策略来不让别人改。
扩展ThreadPoolExecutor
它提供了几个方法是可以在子类中重写的:
afterExecute在run方法正常执行完或是抛出异常时会执行。但如是如果完成后带一个
Error就不会被执行。
beforeExecute在任务执行前运行,但如果它抛出了RuntimeException那么任务就不会
执行。
terminated在线程池关闭时调用。
例子:给线程池添加统计信息
public class TimingThreadPool extends ThreadPoolExecutor {
	private final ThreadLocal<Long> startTime = new ThreadLocal<Long>();
	private final Logger log = Logger.getLogger("TimingThreadPool");
	private final AtomicLong numTasks = new AtomicLong();
	private final AtomicLong totalTime = new AtomicLong();

	protected void beforeExecute(Thread t, Runnable r) {
		super.beforeExecute(t, r);
		log.fine(String.format("Thread %s: start %s", t, r));
		startTime.set(System.nanoTime());
	}

	protected void afterExecute(Runnable r, Throwable t) {
		try {
			long endTime = System.nanoTime();
			long taskTime = endTime - startTime.get();
			numTasks.incrementAndGet();
			totalTime.addAndGet(taskTime);
			log.fine(String.format("Thread %s: end %s, time=%dns",
					t, r, taskTime));
		} finally {
			super.afterExecute(r, t);
		}
	}

	protected void terminated() {
		try {
			log.info(String.format("Terminated: avg time=%dns",
			totalTime.get() / numTasks.get()));
		} finally {
			super.terminated();
		}
	}

}
外部锁(显示锁)
JDK5还提供了外部锁:java.util.concurrent.locks.Lock。补充synchronized对应
的内置锁。如外部锁可以newCondition()方法设置多个Condition条件,而内部锁
synchronized中锁对象的wait()和notify()、notifyAll()只能实现一个隐含条件
如果要和多个条件关联要添加一个锁。
- 外部锁在等不到锁时可放弃等锁转处理其他任务。
- 外部锁构造函数可指定为公平锁(多个等锁的请求按申请锁的顺序给锁)。
-
外部锁可以
newCondition()方法设置多个Condition条件。 -
内置锁在
synchronized代码结束后自动释放。无论是正常离开还是异常跳转。 - 内置锁无法实现非阻塞结构的加锁规则。
-
外部锁必须手动释放,所以一定要在
finally块中释放。
创建外部锁
Lock的实现类ReentrantLock可能对已经获得锁的线程重新请示锁。
Lock lock = new ReentrantLock();

lock.lock();
try {
	/* do something */
} finally {
	lock.unlock();
}
避免死锁
内置锁容易死锁,外部锁tryLock()方法尽量避免死锁。因为这个方法会在取不到锁时
退回,下次再试。
如下面的在两个账户之间的转账程序,通过轮询的方式反常尝试取得锁:
public void transferMoney(Account fromAccount, Account toAccount,
		BigDecimal amt)
{
	while (true) {
		if (fromAccount.lock.tryLock()) {
			try {
				if (toAccount.lock.tryLock()) {
					try {
						if (fromAccount.getBalance().Compareto(amount) < 0) {
							throw new InsufficientFundsException(); // 余额不足
						} else {
							fromAccount.debit(amount);
							toAccount.credit(amount);
					} finally {
						toAccount.lock.unlock();
					}
				}
			} finally {
				fromAccount.lock.unlock();
			}
		}
	}
}
还可以指定时限:
if (!lock.tryLock(time, NANOSECONDS))
	return false;
try {
	/* do something */
} finally {
	lock.unlock();
}
还可以指定取锁过程中可以响应中断。这样还要多加一个try-catch再处理中断异常的:
try {
	lock.lockInterruptibly(); // 可中断
	try {
		// do something
	} finally {
		lock.unlock();
	}
} catch (InterruptedException) {
	// do something
}
分开读写锁
ReentrantReadWriteLock分开读写锁以取得更加细的控制:
private final ReadWriteLock monitor = new ReentrantReadWriteLock();

monitor.readLock.lock()
monitor.readLock.unlock()

monitor.writeLock.lock()
monitor.writeLock.unlock()
例:成员变量有a、b两个,操作有三个:
-
读
a -
读
b -
同时修改
a与b
可以用读锁控制前两个操作,写锁控制后一个。这样两个读操作就看不到第三个操作执行
了一半,只改了a还没有修改b这样的情况。
对于大量读而少量改的情况下,读写锁可以明显提升性能:
public class ReadWriteMap<K,V> {
	private final Map<K,V> map;
	private final ReadWriteLock lock = new ReentrantReadWriteLock();
	private final Lock r = lock.readLock();
	private final Lock w = lock.writeLock();

	public ReadWriteMap(Map<K,V> map) {
	this.map = map;
	}

	public V put(K key, V value) {
		w.lock();
		try {
			return map.put(key, value);
		} finally {
			w.unlock();
		}
	}

	// Do the same for remove(), putAll(), clear()
	public V get(Object key) {
		r.lock();
		try {
			return map.get(key);
		} finally {
			r.unlock();
		}
	}

	// Do the same for other read-only Map methods
}
当然ConcurrentHashMap性能已经不错了。这里演示了一下怎么提高其他的Map的并发
性能。
使用ReentrantLock和Lambda表达式让同步更纯净
Java的ReentrantLock示例,synchronized和ReentrantLock之间的不同之处, Javin Paul,2013年3月7日。
ReentrantLock,笨重的try-final代码块需要谨慎使用。相对于冗长的匿名类现在有了 Java8和Lambda表达式。所以「计数器」测试用例,并开始重构。起初的代码是这样的:
class Counter {

  private final Lock lock;
  private int count;

  Counter() {
    lock = new ReentrantLock();
  }

  int next() {
    lock.lock();
    try {
      return count++;
    } finally {
      lock.unlock();
    }
  }
}
可以清楚地看到,try-final那丑陋的代码块给实际的函数带来了很多杂乱的东西。 解决方法:
将这段代码块封装在单独的类中,作为同步的一部分,并对外提供增加同步代码的方法。 下面展示了新创建的Operation接口,以及它如何使用Lambda表达式。
我决定返回一个参数来替代int,这样,同步机制就可以更好地重用。但是我不确定 在这里由于性能或者其他原因,自动装箱会不会不加判断的重用,所以对于一个通用的 方法,这里还有很多要考虑的地方,这就不是本文所涉及的范围了……
class Counter {

  private final Lock lock;
  private int count;

  interface Operation<T> {
    T execute();
  }

  Counter() {
    lock = new ReentrantLock();
  }

  int next() {
    lock.lock();
    try {
      Operation<Integer> operation = () -> { return count++; };
      return operation.execute();
    } finally {
      lock.unlock();
    }
  }
}
在下面的类提取步骤中,声明了Syschronizer类,以确保给的Opreation在同步的范围内 进行了适当的操作:
class Counter {

  private final Synchronizer synchronizer;
  private int count;

  interface Operation<T> {
    T execute();
  }

  static class Synchronizer {

    private final Lock lock;

    Synchronizer() {
      lock = new ReentrantLock();
    }

    private int execute( Operation<Integer> operation ) {
      lock.lock();
      try {
        return operation.execute();
      } finally {
        lock.unlock();
      }
    }
  }

  Counter() {
    synchronizer = new Synchronizer();
  }

  int next() {
    return synchronizer.execute( () -> { return count++; } );
  }
}
如果没错的话,这应该是作为一个初始类。测试顺利通过了,虽然JUnit测试在并发方面的 测试不全面,但最后的一点修改至少保证了在单元测试的并发中顺序是合理的。
public class Counter {

  final Synchronizer<Integer> synchronizer;
  final Operation<Integer> incrementer;

  private int count;

  public Counter( Synchronizer<Integer> synchronizer ) {
    this.synchronizer = synchronizer;
    this.incrementer = () -> { return count++; };
  }

  public int next() {
    return synchronizer.execute( incrementer );
  }
}
如此以来,Operation和Syschronizer都被移动到了单独的文件中。通过这种方式, 同步方面的性能提高了,并且可以分开进行单元测试了。Counter类现在使用了构造函数 来传入一个Syschronizer实例。
修改构造函数最不可能的目的可能就是,向默认的构造器引入一个Syschronized的示例,
像this( new Syschronized() );,但是出于测试目的,这是可以接受的。
此外,添加操作独立封装成incrementer。但是测试时,final值没有是公开的。为了
避免违背原则,使用Mockito的办法对Syschronizer进行优化以确保合适的调用:
@Test
public void synchronization() {
    Synchronizer<Integer> synchronizer = spy( new Synchronizer<>() );
    Counter counter = new Counter( synchronizer );

    counter.next();

    verify( synchronizer ).execute( counter.incrementer );
  }
鉴于单元测试和测试用例之间的紧密耦合,通常我不过分退出调用方法验证。但如果 有紧急情况,这样做也不算太坏。在此,我仅仅做了Java 8和Lambda表达式的一个热身 活动,可能还忽略了并发性的内容——你觉得的呢?
Condition
条件队列的缺陷
例子:现在有一个队列被多个线程访问。
出队方法检查如果没有元素就等待其他线程放入元素以后再唤醒它。成功放入元素以后, 它也会唤醒一下其他线程,因为可能有别的取出线程看到队列空了以后等待有元素的:
public void put(Object obj) {
	while(this.isFull())
		wait();

	doPut(obj);
	notifyAll();
}
以上设计有些问题:
- 被唤醒的原因不一定是因为队列不满了。
- 就算是因为队列空了,也有可能在异步过程中其他线程又放满了。
对于以上的忙等待模式,可以改进为下面的套路:用一个对象作为锁来同步防止又被改掉 了:
void func() throws InterruptException {
	synchronized (lock) {
		while(!isReady)
			lock.wait();

		// do something
	}
}
这样解决了出错问题,但还有性能问题:notify()选一个唤醒,而notifyAll()会唤醒
多个线程。很多被唤醒的线程不是真的满足了条件,它们会又一次竞争锁。然后只有一个
得到锁其他的又进入等待。这样很浪费。
另外,推荐调用notifyAll,虽然性能比notify低,但是更容易确保类的行为是正确的
。
使用Condition
Condition提供了更加细致的条件,比条件队列要好。接口的主要方法:
public interface Condition {
	void await() throws InterruptedException;
	boolean await(long time, TimeUnit unit) throws InterruptedException;
	long awaitNanos(long nanosTimeout) throws InterruptedException;
	void awaitUninterruptibly();
	boolean awaitUntil(Date deadline) throws InterruptedException;
	void signal();
	void signalAll();
}
Condition通过外部锁Lock.newCondition方法创建。对于同一个Lock可以有多个
Condition。Condition继承了相关Lock对象的公平性,对于公平的锁,线程会按FIFO
顺序从Condtion.await中释放。
通过Lock对象的newCondition方法来取得Condition对象。它的await方法会释放锁
并挂起当前线程,等待其他线程调用这个对象的signal或signalAll访求表示条件已经
满足。这些方法的调用推荐用try-finally包起来。
例子:
@ThreadSafe
public class ConditionBoundedBuffer<T> {

	protected final Lock lock = new ReentrantLock();

	// CONDITION PREDICATE: notFull (count < items.length)
	private final Condition notFull = lock.newCondition();
	// CONDITION PREDICATE: notEmpty (count > 0)
	private final Condition notEmpty = lock.newCondition();

	@GuardedBy("lock")
	private final T[] items = (T[]) new Object[BUFFER_SIZE];
	@GuardedBy("lock")
	private int tail, head, count;

	// BLOCKS-UNTIL: notFull
	public void put(T x) throws InterruptedException {
		lock.lock();
		try {
			while (count == items.length)
				notFull.await();
			items[tail] = x;
			if (++tail == items.length)
				tail = 0;
			++count;
			notEmpty.signal();
		} finally {
			lock.unlock();
		}
	}

	// BLOCKS-UNTIL: notEmpty
	public T take() throws InterruptedException {
		lock.lock();
		try {
			while (count == 0)
				notEmpty.await();
			T x = items[head];
			items[head] = null;
			if (++head == items.length)
				head = 0;
			--count;
			notFull.signal();
			return x;
		} finally {
			lock.unlock();
		}
	}

}
例子: 时间监听器接口在时间增长时执行操作:
package thread;

import java.util.Date;

public interface ClockListener {

    public void update(Date date);

}
时钟类记录时间增长:
package thread;

import java.util.Date;

public class Clock implements Runnable {
    private ClockListener listener;
    private boolean run = true;

    public Clock(ClockListener listener) {
        this.listener = listener;
        new Thread(this).start();
    }

    @Override
    public void run() {
        long lastTime = System.currentTimeMillis();
        while (this.run) {
            try {
                Thread.sleep(10);
            } catch (InterruptedException e) {
                // do nothing
            }
            long now = System.currentTimeMillis();
            if ((now / 1000) - (lastTime / 1000) >= 1) {
                listener.update(new Date(now));
                lastTime = now;
            }
        }
    }

    public void stop() {
        this.run = false;
    }

}
测试,检查记录的时间列表是不是每个时间项目都比前一个增加一秒钟:
package thread;

import java.util.Date;

public class Clock implements Runnable {
    private ClockListener listener;
    private boolean run = true;

    public Clock(ClockListener listener) {
        this.listener = listener;
        new Thread(this).start();
    }

    @Override
    public void run() {
        long lastTime = System.currentTimeMillis();
        while (this.run) {
            try {
                Thread.sleep(10);
            } catch (InterruptedException e) {
                // do nothing
            }
            long now = System.currentTimeMillis();
            if ((now / 1000) - (lastTime / 1000) >= 1) {
                listener.update(new Date(now));
                lastTime = now;
            }
        }
    }

    public void stop() {
        this.run = false;
    }

}
理解Condition
在java.util.concurrent包中,有两个很特殊的工具类,Condition和ReentrantLock, 使用过的人都知道,ReentrantLock(重入锁)是jdk的concurrent包提供的一种独占锁的 实现。它继承自Dong Lea的AbstractQueuedSynchronizer(同步器),确切的说是 ReentrantLock的一个内部类继承了AbstractQueuedSynchronizer,ReentrantLock只不过 是代理了该类的一些方法,可能有人会问为什么要使用内部类在包装一层? 我想是安全的 关系,因为AbstractQueuedSynchronizer中有很多方法,还实现了共享锁,Condition等 功能,如果直接使ReentrantLock继承它,则很容易出现AbstractQueuedSynchronizer中的 API被无用的情况。
ReentrantLock和Condition的使用方式通常是这样的:
public static void main(String[] args) {
    final ReentrantLock reentrantLock = new ReentrantLock();
    final Condition condition = reentrantLock.newCondition();

    Thread thread = new Thread((Runnable) () -> {
            try {
                reentrantLock.lock();
                System.out.println("我要等一个新信号" + this);
                condition.wait();
            }
            catch (InterruptedException e) {
                e.printStackTrace();
            }
            System.out.println("拿到一个信号!!" + this);
            reentrantLock.unlock();
    }, "waitThread1");

    thread.start();

    Thread thread1 = new Thread((Runnable) () -> {
            reentrantLock.lock();
            System.out.println("我拿到锁了");
            try {
                Thread.sleep(3000);
            }
            catch (InterruptedException e) {
                e.printStackTrace();
            }
            condition.signalAll();
            System.out.println("我发了一个信号!!");
            reentrantLock.unlock();
    }, "signalThread");

    thread1.start();
}
运行后,结果如下:
我要等一个新信号lock.ReentrantLockTest$1@a62fc3
我拿到锁了
我发了一个信号!!
拿到一个信号!!
可以看到:
-
Condition的执行方式,是当在线程1中调用
await方法后,线程1将释放锁,并且将自己沉睡 ,等待唤醒, -
线程2获取到锁后,开始做事,完毕后,调用Condition的
signal方法,唤醒线程1, 线程1恢复执行。
以上说明Condition是一个多线程间协调通信的工具类,使得某个,或者某些线程一起等待 某个条件(Condition),只有当该条件具备( signal 或者 signalAll方法被带调用)时 , 这些等待线程才会被唤醒,从而重新争夺锁。
Condition实现原理
首先还是要明白,reentrantLock.newCondition()返回的是Condition的一个实现,
该类在AbstractQueuedSynchronizer中被实现,叫做newCondition()。
public Condition newCondition() { return sync.newCondition(); }
它可以访问AbstractQueuedSynchronizer中的方法和其余内部类( AbstractQueuedSynchronizer是个抽象类,至于他怎么能访问,这里有个很奇妙的点, 后面我专门用demo说明 )
现在,我们一起来看下Condition类的实现,还是从上面的demo入手,为了方便书写,我将 AbstractQueuedSynchronizer缩写为AQS。
当await被调用时,代码如下:
public final void await() throws InterruptedException {
	if (Thread.interrupted()) {
		throw new InterruptedException();
	}

	/* 将当前线程包装下后, 添加到Condition自己维护的一个链表中。 */
	Node node = addConditionWaiter();

	/* 释放当前线程占有的锁,从demo中看到,调用await前,当前线程是占有锁的 */
	int savedState = fullyRelease(node);

	int interruptMode = 0;
	while (!isOnSyncQueue(node)) {
		/*
		 * 释放完毕后,遍历AQS的队列,看当前节点是否在队列中,
		 * 不在说明它还没有竞争锁的资格,所以继续将自己沉睡。
		 * 直到它被加入到队列中,聪明的你可能猜到了,
		 * 没有错,在singal的时候加入不就可以了?
		 */
		LockSupport.park(this);
		if ((interruptMode = checkInterruptWhileWaiting(node)) != 0) {
			break;
		}
	}
	// 被唤醒后,重新开始正式竞争锁,同样,如果竞争不到还是会将自己沉睡,等待唤醒重新开始竞争。
	if (acquireQueued(node, savedState) && interruptMode != THROW_IE) {
		interruptMode = REINTERRUPT;
	}
	if (node.nextWaiter != null) {
		unlinkCancelledWaiters();
	}
	if (interruptMode != 0) {
		reportInterruptAfterWait(interruptMode);
	}
}
回到上面的demo,
- 锁被释放后,线程1开始沉睡
- 这个时候线程因为线程1沉睡时,会唤醒AQS队列中的头结点,所所以线程2会开始竞争锁 ,并获取到
- 等待3秒后,线程2会调用 signal方法,「发出」signal信号
signal方法如下:
public final void signal() {
	if (!isHeldExclusively()) {
		throw new IllegalMonitorStateException();
	}
	// firstWaiter为condition自己维护的一个链表的头结点,
	// 取出第一个节点后开始唤醒操作
	Node first = firstWaiter;
	if (first != null) doSignal(first);
}
说明下,其实Condition内部维护了等待队列的头结点和尾节点,该队列的作用是存放等待 signal信号的线程,该线程被封装为Node节点后存放于此。
public class ConditionObject implements Condition, java.io.Serializable {
	private static final long serialVersionUID = 1173984872572414699L;
	/** First node of condition queue. */
	private transient Node firstWaiter;
	/** Last node of condition queue. */
	private transient Node lastWaiter;

}
而Condition自己也维护了一个队列,该队列的作用是维护一个等待signal信号的队列, 两个队列的作用是不同,事实上,每个线程也仅仅会同时存在以上两个队列中的一个, 流程是这样的:
-
线程1调用
reentrantLock.lock时,线程被加入到AQS的等待队列中。 -
线程1调用
await方法被调用时,该线程从AQS中移除,对应操作是锁的释放。 - 接着马上被加入到Condition的等待队列中,意味着该线程需要signal信号。
- 线程2,因为线程1释放锁的关系,被唤醒,并判断可以获取锁,于是线程2获取锁, 并被加入到AQS的等待队列中。
-
线程2调用
signal方法,这个时候Condition的等待队列中只有线程1一个节点,于是 它被取出来,并被加入到AQS的等待队列中。 注意,这个时候,线程1 并没有被唤醒。 -
signal方法执行完毕,线程2调用reentrantLock.unLock()方法,释放锁。这个时候 因为AQS中只有线程1,于是,AQS释放锁后按从头到尾的顺序唤醒线程时,线程1被唤醒, 于是线程1回复执行。 - 直到释放所整个过程执行完毕。
可以看到,整个协作过程是靠结点在AQS的等待队列和Condition的等待队列中来回移动 实现的,Condition作为一个条件类,很好的自己维护了一个等待信号的队列,并在适时的 时候将结点加入到AQS的等待队列中来实现的唤醒操作。
看到这里,signal方法的代码应该不难理解了。
取出头结点,然后doSignal:
public final void signal() {
	if (!isHeldExclusively()) {
		throw new IllegalMonitorStateException();
	}
	Node first = firstWaiter;
	if (first != null) {
		doSignal(first);
	}
}

private void doSignal(Node first) {
	do {
		// 修改头结点,完成旧头结点的移出工作
		if ((firstWaiter = first.nextWaiter) == null)
			lastWaiter = null;
		first.nextWaiter = null;
	} while (!transferForSignal(first) && // 将老的头结点,加入到AQS的等待队列中
			(first = firstWaiter) != null);
}

final boolean transferForSignal(Node node) {
	/*
	 * If cannot change waitStatus, the node has been cancelled.
	 */
	if (!compareAndSetWaitStatus(node, Node.CONDITION, 0))
		return false;

	/*
	 * Splice onto queue and try to set waitStatus of predecessor to
	 * indicate that thread is (probably) waiting. If cancelled or attempt
	 * to set waitStatus fails, wake up to resync (in which case the
	 * waitStatus can be transiently and harmlessly wrong).
	 */
	Node p = enq(node);
	int ws = p.waitStatus;
	// 如果该结点的状态为cancel 或者修改waitStatus失败,则直接唤醒。
	if (ws > 0 || !compareAndSetWaitStatus(p, ws, Node.SIGNAL))
		LockSupport.unpark(node.thread);
	return true;
}
可以看到,正常情况ws > 0 || !compareAndSetWaitStatus(p, ws, Node.SIGNAL)这个
判断是不会为true的,所以,不会在这个时候唤醒该线程。
只有到发送signal信号的线程调用reentrantLock.unlock()后因为它已经被加到AQS的
等待队列中,所以才会被唤醒。
本文从代码的角度说明了Condition的实现方式,其中,涉及到了AQS的很多操作,比如 AQS的等待队列实现独占锁功能,不过,这不是本文讨论的重点,等有机会再将AQS的实现 单独分享出来。
Synchronizer
AQS
ReentrantLock与Semaphore这两个接口的功能很相像,甚至可以通过ReentrantLock
来实现Semaphore或反过来。下面是一个用Lock械实现信号量的例子:
@ThreadSafe
public class SemaphoreOnLock {
	private final Lock lock = new ReentrantLock();
	// CONDITION PREDICATE: permitsAvailable (permits > 0)
	private final Condition permitsAvailable = lock.newCondition();
	@GuardedBy("lock") private int permits;

	SemaphoreOnLock(int initialPermits) {
		lock.lock();
		try {
			permits = initialPermits;
		} finally {
			lock.unlock();
		}
	}

	// BLOCKS-UNTIL: permitsAvailable
	public void acquire() throws InterruptedException {
		lock.lock();
		try {
			while (permits <= 0)
			permitsAvailable.await();
			--permits;
		} finally {
			lock.unlock();
		}
	}

	public void release() {
		lock.lock();
		try {
			++permits;
			permitsAvailable.signal();
		} finally {
			lock.unlock();
		}
	}
}
实际上外部锁和信号量都是用了同一个基类AbstractQueuedSynchronizer即AQS,它是
很多其他同步类的基类。AQS是一个用于构造锁和同步的框架,CountDownLatch、
SynchronousQueue、FutureTask等都是通过它实现的。
通过实现AQS构建同步器不心处理在多个位置上的竞争问题,它只会在一个时刻发生阻塞, 降低了上下文开销。
实现AQS
一般现有的工具已经够用了。但是有必要了解一下通过AQS实现同步器的原理。最基本的 两个操作是「获取(acquire)」和「释放(release)」。
一般获取操作要依赖状态,并通常会阻塞。比如取得锁或信号量、CountDownLatch中等待
闭锁到结束状态、FutureTask中等待任务完成。
释放操作是不可阻塞的,所以请求时被阻塞的线程都开始执行。
AQS中的状态是一个整数信息,可心通过getState、setState、compareSetState等
protected方法来操作。例如在ReentrantLock中用它来表示所有者线程已经重复取得
该锁的次数、信号量中用来表示剩下的许可数量,FutureTask用来表示任务的状态。
实现类中还可以加上新的信息,如ReentrantLock中保存了锁的所有者信息,这样就可以
区别这是重入不审锁竞争。
下面的伪代码显示了AQS中获取操作与释放操作的形式:
boolean acquire() throws InterruptedException {
	while (当前状态不允许获取操作) {
		if (需要阻塞获取请求) {
			如果当前线程不在队列中,把它放入队列
			阻塞当前线程
		}
		else
			return failure
	}
	可能更新同步器的状态
	如果线程在队列中,反它移出队列
	return success
}

void release() {
	更新同步器状态
	if (新状态允许某个被阻塞的线程成功获取)
		解除队列中一个或多个线程的阻塞状态
}
根据同步器的不同,获取操作可以是独占操作(如ReentrantLock),也可以是非独占的
(如信号量和CountDownLatch)。
一个获取操作分成两步。先是判断是否能获取,可以就允许线程执行,不可以就阻塞或失败 。比如锁是否被其他线程持有,闭锁是否处于结束状态。然后再更新同步器的状态,这可能 会对其他线程是否能取得这个同步器造成影响。如果是个锁的话,被一个线程获取了就不能 被其他线程获取了。
如果某同步器支持独占操作,那么要再实现一些保护方法:tryAcquire、tryRelease、
isHeldExclusively等。如果是可以共享取得同步器的,应该实现:tryAcquireShared
、tryReleaseShared等方法。
实现一个简单的闭锁
一个简单的二元闭锁。两个公有方法await和signal分别对应获取和释放。我们定义
state为1时表示打开,为0时表示锁住:
@ThreadSafe
public class OneShotLatch {
	private final Sync sync = new Sync();

	public void signal() {
		sync.releaseShared(0);
	}

	public void await() throws InterruptedException {
		sync.acquireSharedInterruptibly(0);
	}

	private class Sync extends AbstractQueuedSynchronizer {

		protected int tryAcquireShared(int ignored) {
			// Succeed if latch is open (state == 1), else fail
			return (getState() == 1) ? 1 : -1;
		}

		protected boolean tryReleaseShared(int ignored) {
			setState(1); // Latch is now open
			return true; // Other threads may now be able to acquire

		}
	}
}
注意这里没有直接继承AQS而是在外面包了一层,但这样会暴露出太多AQS的方法给用户,
所以java.util.concurrent包中很多同步器也没有用继承的方式。
Java并发包中的AQS
介绍一下Java提供的同步器中是如何使用AQS的。
ReentrantLock
只支持独占获取操作,所以实现了tryAcquire、tryRelease、isHeldExclusively。
同步状态保存获取锁操作的次数,还有一个owner变量记录当前所有的线程。在
tryRelease中检查owner以保证当前线程执行unlock时已经获取了锁。tryAcquire
中使用owner来判断操作是重入还是竞争:
protected boolean tryAcquire(int ignored) {
	final Thread current = Thread.currentThread();
	int c = getState();
	if (c == 0) {
		if (compareAndSetState(0, 1)) {
			owner = current;
			return true;
		}
	} else if (current == owner) {
		setState(c+1);
		return true;
	}
	return false;
}
Semaphore与CountDownLatch
信号量的AQS状态用于保存可用的许可数量。tryAcquireShared方法来操作许可数量。
在检查到还有可用的情况下用compareAndSetState以原子操作方式减少许可。
protected int tryAcquireShared(int acquires) {
	while (true) {
		int available = getState();
		int remaining = available - acquires;
		if (remaining < 0 || compareAndSetState(available, remaining))
			return remaining;
	}
}

protected boolean tryReleaseShared(int releases) {
	while (true) {
		int p = getState();
		if (compareAndSetState(p, p + releases))
			return true;
	}
}
CountDownLatch也类似,countDown方法调用release;await调用acquire,当
计数器为0时acquire方法立即返回,不然就阻塞。
FutureTask
虽然看起来不像是同步器,但Future.get语言非常像闭锁。这里用AQS状态来保证任务
执行状态,还有其他的状态来保存异常与计算结果。
还特别维护了一个引用指向执行计算任务的线程,因为任务如果取消,这个线程就会中断 。
ReentrantReadWriteLock
虽然有读和写两个锁,实现中是用单个AQS子类同时管理两个锁。状态值是32位整数。它 用了16位的状态来表示写入锁计数,并用另一个16位状态来表示读取锁读数。在读锁上的 操作将使用共享的获取方法与释放方法,在写锁上的操作使用独占的获取方法与释放方法。
AQS在内部维护一个等待线程队列,其中记录了某个线程请求是独占的还是共享。在读写锁 中,锁可用时如果位于队头部的线程执行的是写入,那会取得这个锁。如果是读操作,那第 队列中在第一个写入线程之前的所有线程都将获取这个锁。
Fork-Join
Java 7新提供了「Fork-Join」机制。在多个线程并行的情况下,如果有些进程处于等待 状态会自动转而处理其他可以进行的任务以提高性能。
适合Fork-Join的情况:
- 任务开销不要太大;希望没有副作用;希望没有同步操作。
- 适合分解成小的任务。
实现方式
实现RecursiveTask接口,并重写compute方法。里面可以执行多个ForkJoinTask。
invokeAll启动所以的任务,先完成或阻塞的子任务会自动转而完成还没有完成的任务。
如:
private static class FileSizeFinder extends RecursiveTask<Long> {
	@Override
	public Long compute() {
		long size = 0;

		List<ForkJoinTask<Long>> tasks = new ArrayList<ForkJoinTask<Long>>();
		// add task to list
		// ...

		for(final ForkJoinTask<Long> task : invokeAll(tasks)) {
			size += task.join();
		}
		return size;
	}
}
调用时用ForkJoinPool:
private final static ForkJoinPool forkJoinPool = new ForkJoinPool();
final long total = forkJoinPool.invoke(new FileSizeFinder(new File(args[0])));
注意forkJoinPool必须是静态成员才可以在整个应用中共享。
统计目录下所有文件大小的完整代码如下:
package com.agiledeveloper.pcj;

import java.util.concurrent.ForkJoinPool;
import java.util.concurrent.ForkJoinTask;
import java.util.concurrent.RecursiveTask;
import java.util.List;
import java.util.ArrayList;
import java.io.File;

public class FileSize {

	private final static ForkJoinPool forkJoinPool = new ForkJoinPool();

	private static class FileSizeFinder extends RecursiveTask<Long>
	{
		final File file;

		public FileSizeFinder(final File theFile) {
			file = theFile;
		}

		@Override
		public Long compute() {
			long size = 0;
			if (file.isFile()) {
				size = file.length();
			} else {
				final File[] children = file.listFiles();
				if (children != null) {
					List<ForkJoinTask<Long>> tasks =
						new ArrayList<ForkJoinTask<Long>>();
					for(final File child : children) {
						if (child.isFile()) {
							size += child.length();
						} else {
							tasks.add(new FileSizeFinder(child));
						}
					}

					for(final ForkJoinTask<Long> task : invokeAll(tasks)) {
						size += task.join();
					}
				}
			}

			return size;
		}
	}

	public static void main(final String[] args) {
		final long start = System.nanoTime();
		final long total = forkJoinPool.invoke(
				new FileSizeFinder(new File(args[0])));
		final long end = System.nanoTime();
		System.out.println("Total Size: " + total);
		System.out.println("Time taken: " + (end - start)/1.0e9);
	}
}