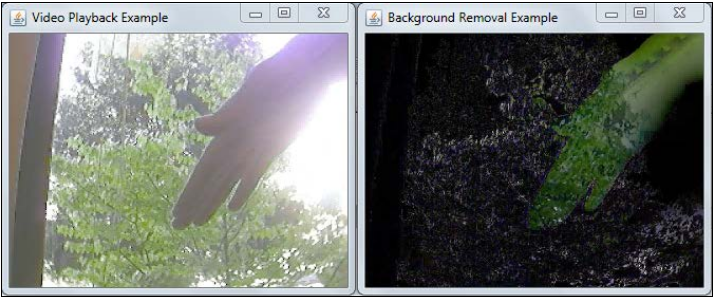
用Kinect侦测前景背景与景深
移除背景
定义接口,接收视频中的下一帧,然后得出变化的前景图像?
trait FrontgroundDetecter { def drawFrontground(image: Mat): Mat }
对比帧差异
public static void absdiff(Mat backgroundImg, Mat inputImg, Mat foregroundImg)
记录下视频的第一帧,然后与之后的每一帧对比,变化的部分就是前景:
class AbsDifferenceBackground(val backgroundImage: Mat) //
	extends FrontgroundDetecter
{
	override def drawFrontground(image: Mat): Mat = {
		val foregroundImage = new Mat()
		Core.absdiff(backgroundImage, image, foregroundImage)
		return foregroundImage
	}
}
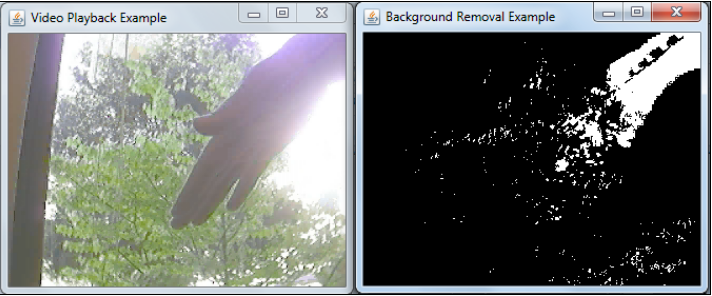
对比帧的缺点是会把背景中摇动的叶子也记录为变动的前景。
平均值背景
为了避免把背景中摇动的叶子也记录为变动的前景。 不要总是用第一帧与当前帧比,可以用之前帧的平均值与当前帧对比:
\[ u_t = (1-a)u_{t-1} + ap_t \]- \(p_t\) is the new pixel value;
- \(u_{t-1}\) is the value of the average background at
- time \(t-1\) , which would be the last frame;
- \(u_t\) t is the new value for the background;
- \(α\) is the learning rate.
OpenCV已经提供了Imgproc.accumulateWeighted():
public static void accumulateWeighted(
		Mat inputFloating,
		Mat accumulatedBackground,
		double learningRate,
		Mat foregroundThresh);
class RunningAverageBackground(val learningRate: Double = 0.01, //
	val threshold: Int = 60) extends FrontgroundDetecter //
{
	private[this] val inputGray = new Mat();
	private[this] val accumulatedBackground = new Mat();
	private[this] val backImage = new Mat();
	private[this] val foreground = new Mat();

	override def drawFrontground(image: Mat): Mat = {
		val foregroundThresh = new Mat()
		// Firstly, convert to gray-level image,
		// yields good results with performance
		Imgproc.cvtColor(image, inputGray, Imgproc.COLOR_BGR2GRAY)
		// initialize background to 1st frame, convert to floating type
		if (accumulatedBackground.empty()) {
			inputGray.convertTo(accumulatedBackground, CvType.CV_32F)
		}
		// convert background to 8U, for differencing with input image
		accumulatedBackground.convertTo(backImage,CvType.CV_8U)
		// compute difference between image and background
		Core.absdiff(backImage,inputGray,foreground)

		// apply threshold to foreground image
		Imgproc.threshold(foreground,foregroundThresh, threshold, 255, //
			Imgproc.THRESH_BINARY_INV)

		// accumulate background
		val inputFloating = new Mat()
		inputGray.convertTo(inputFloating, CvType.CV_32F)
		Imgproc.accumulateWeighted(inputFloating, accumulatedBackground, //
			learningRate, foregroundThresh)

		negative(foregroundThresh)
	}

	private[this] def negative(foregroundThresh: Mat): Mat = {
		val result = new Mat();
		val white = foregroundThresh.clone();
		white.setTo(new Scalar(255.0));
		Core.subtract(white, foregroundThresh, result);
		result
	}
}
虽然可以通过把彩色分为RGB三个通道处理,但为简单还是先把图片黑心为灰度。
然后对比两帧得到变动的前景。再通过Imgproc.THRESH_BINARY_INV域值过滤掉小的噪点。
然后得到的图片可以作为之后acccumulateWeighted的遮盖过滤掉背景上不变的部分,
这样通过调整阈值参数可以得到较好的效果:
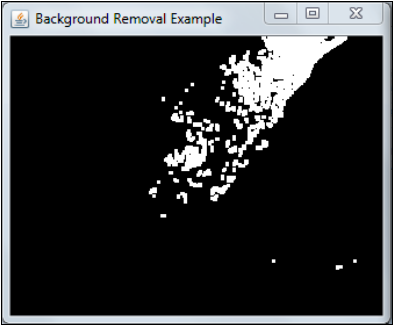
混合高斯方法
Mixture of Gaussians model(MOG)能更好地处理背景中舞动的树叶。
老版本的Grimson算法开始学习的速度慢而且不能区分移动的物体与影子。
所以这里用强化过的org.opencv.video.Video.BackgroundSubtractorMOG2:
org.opencv.video..Video.createBackgroundSubtractorMOG2(
		int history, double varThreshold, boolean detectShadows)
-
hinstory过去的长度,默认500。 -
varThresholdthe threshold on the squared Mahalanobis distance between the pixel and the model to decide whether a pixel is well described by the background model,默认16; -
detectShadows是否要识别并标记影子。
例子:
class MixtureOfGaussianBackground(val learningRate: Double = 0.01) extends //
	FrontgroundDetecter
{

	private[this] val mog =
		org.opencv.video.Video.createBackgroundSubtractorMOG2()
	private[this] val foreground = new Mat()

	override def drawFrontground(image: Mat): Mat = {
		mog.apply(image, foreground, learningRate);
		return foreground;
	}

}

在混合高斯算法的基础上,再加上一点形态变化操作,就可以得到非常好的结果:
轮廓识别
找到轮廓
对黑白图像进行轮廓识别:
// Impproc
public static void findContours(Mat image,
                                List<MatOfPoint> contours,
                                Mat hierarchy,
                                int mode,
                                int method,
                                Point offset)
实现了Suzuki的论文《Topological structural analysis of digitized binary images by border following》中描述的Suzuki算法。
-
contours:识别出来的轮廓会存放到参数列表中。 -
hierarchy:an optional output vector that is set for each contour found. They represent 0-based indices of the next and previous contours at the same hierarchical level, the first child contour, and the parent contour, represented in the hierarcy[i] [0] , hierarcy[i][1] , hierarcy[i][2] , and hierarcy[i][3] elements, respectively for a given i contour. If there aren't contours corresponding to those values, they will be negative. -
mode:定义层级关系。Imgproc.RETR_LIST是无脑设置。Imgproc.CHAIN_APPROX_NONEis set, all the contour points are stored. On the other hand, when usingImgproc.CHAIN_APPROX_SIMPLEfor this value, horizontal, vertical, and diagonal lines are compressed by using only their endpoints.
画出轮廓
// Imgproc
public static void drawContours(Mat image,
                                java.util.List<MatOfPoint> contours,
                                int contourIdx,
                                Scalar color)
-
image:输出图像。 -
contours:找到的轮廓。 -
contourIdx:线类型。 -
color:颜色。
轮廓包围的区域
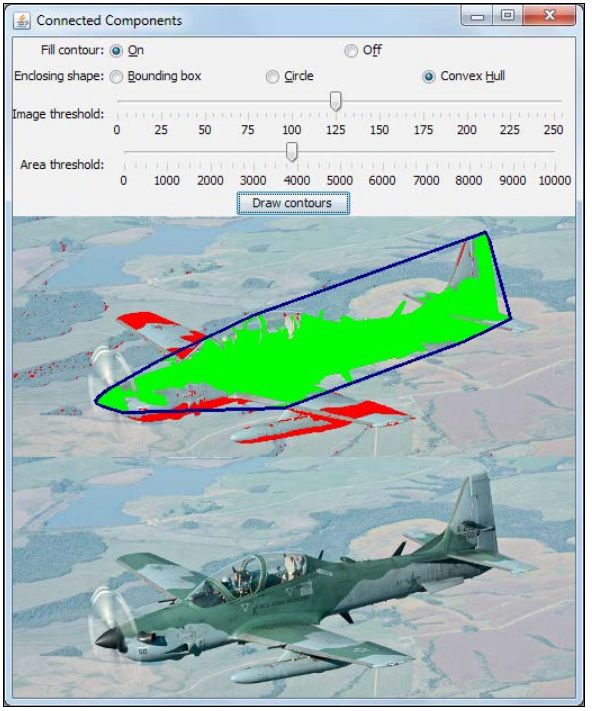
decision is to find the contour area. OpenCV implements this function through Imgproc.contourArea . This function can be found in the chapter6 source code's sample connected project. This application takes an image as input, runs a threshold over it and then uses it for finding the contours. Several options are available for testing the functions discussed in this section, such as whether it is filling the contour or painting the contour according to the area found. The following is a screenshot of this application:
// Imgproc
public static double contourArea(Mat contour, boolean oriented)
综合应用
先把图片二值化,作为提取轮廓的根据:
private def resetOutput(oriImage: Mat, imageThreshold: Int): (Mat, Mat) = {
	val outImage = oriImage.clone()
	val binImage = new Mat(oriImage.rows() ,oriImage.cols(), CvType.CV_8UC1, new Scalar(0))
	val temp = new Mat()
	Imgproc.cvtColor(oriImage, temp, Imgproc.COLOR_BGR2GRAY);
	Imgproc.threshold(temp, binImage, imageThreshold, 255.0, Imgproc.THRESH_BINARY_INV)
	(binImage, outImage)
}
根据二值化的图片找到轮廓的点:
def findContours(binImage: Mat): java.util.ArrayList[MatOfPoint] = {
	val contours = new java.util.ArrayList[MatOfPoint]()
	val contourMat = binImage.clone()
	Imgproc.findContours(contourMat, contours, new Mat(),
		Imgproc.CHAIN_APPROX_NONE, Imgproc.CHAIN_APPROX_SIMPLE)
	logDebug("Number of found contours: {}", contours.size())
	contours
}
按轮廓点画填充或是用凸多边形包起来:
def drawContours(contours: java.util.ArrayList[MatOfPoint], outImage: Mat,
	drawFunc: (MatOfPoint, Mat) => Unit, areaThreshold: Int, isFill: Boolean,
	colorUnderThreshold: Scalar, colorOverThreshold: Scalar): Mat =
{
	val thickness = if(isFill) -1 else 2
	for (i <- 0 until contours.size()) {
		val currentContour = contours.get(i)
		val currentArea = Imgproc.contourArea(currentContour)
		if (currentArea > areaThreshold) {
			logDebug("Contour points: {}", contours.get(i).size().height)
			Imgproc.drawContours(outImage, contours, i, colorOverThreshold, thickness)
			logDebug("Area: {}", currentArea)
			drawFunc(currentContour, outImage)
		} else {
			Imgproc.drawContours(outImage, contours, i, colorUnderThreshold, thickness)
		}
	}
	outImage
}


// 用方框包起来
def drawBoundingBox(currentContour: MatOfPoint, outImage: Mat) {
	val rectangle = Imgproc.boundingRect(currentContour)
	Imgproc.rectangle(outImage, rectangle.tl(), rectangle.br(),
		new Scalar(255, 0, 0), 1)
}

// 用圈包起来
def drawEnclosingCircle(currentContour: MatOfPoint, outImage: Mat) {
	val radius = new Array[Float](1)
	val center = new Point()
	val tmp = new MatOfPoint2f()

	currentContour.convertTo(tmp, CvType.CV_32FC2)
	Imgproc.minEnclosingCircle(tmp, center, radius)

	Imgproc.circle(outImage, center, radius(0).toInt, new Scalar(255, 0, 0))
}

// 凸多边形包起来
def drawConvexHull(currentContour: MatOfPoint, outImage: Mat) {
	val hull = new MatOfInt();
	Imgproc.convexHull(currentContour, hull);

	val hullContours = new java.util.ArrayList[MatOfPoint]()
	val hullMat = new MatOfPoint()
	hullMat.create(hull.size().height.toInt, 1, CvType.CV_32SC2)

	for (j <- 0 until hull.size().height.toInt) {
		val index = (hull.get(j, 0)(0)).toInt
		//val point = Array[Double](
		//	currentContour.get(index, 0)(0),
		//	currentContour.get(index, 0)(1))
		//hullMat.put(j, 0, point)
		hullMat.put(j, 0,
			currentContour.get(index, 0)(0),
			currentContour.get(index, 0)(1))
	}
	hullContours.add(hullMat);
	Imgproc.drawContours(outImage, hullContours, 0, new Scalar(128, 0, 0), 2)
}
We firstly clone our target binary image, so we won't change it. Then, we initialize
the MatOfPoint structure and define the thickness flag. We then run findContours ,
ignoring the output hierarchy matrix. It is time to iterate the contours in the for
loop. We use the Imgproc.contourArea helper function for an area estimate. Based
on that, if it is the previous areaThreshold defined by the slider, it is drawn as green
using the drawContours function or else it is drawn as red.