有状态的对象、实现列表
有状态的对象
类似于JavaBean的getter和setter方法,Scala对象的非私有var x有自动生成的访问方法
x和设值方法x_=。
对于类中的字段:
var hour = 12
会有额外的getter方法hour和setter方法hour_=。方法的访问性与字段一致。
拿这个例子来说:
  class Time {
    var hour = 12
    var minute = 0
  }
和下面的代码是一样的:
  class Time {

    private[this] var h = 12
    private[this] var m = 0

    def hour: Int = h
    def hour_=(x: Int) { h = x }

    def minute: Int = m
    def minute_=(x: Int) { m = x }
  }
所以可以直接定义getter和setter。
下面的代码在setter前进行检查:
  class Time {

    private[this] var h = 12
    private[this] var m = 12

    def hour: Int = h
    def hour_= (x: Int) {
      require(0 <= x && x < 24)
      h = x
    }

    def minute = m
    def minute_= (x: Int) {
      require(0 <= x && x < 60)
      m = x
    }
  }
再看一个温度的例子:
  class Thermometer {

    var celsius: Float = _

    def fahrenheit = celsius * 9 / 5 + 32
    def fahrenheit_= (f: Float) {
      celsius = (f - 32) * 5 / 9
    }
    override def toString = fahrenheit +"F/"+ celsius +"C"
  }
注意:变量celsius的值为_,表示初始化值。对于数值代表0,对于布尔类型代表
false,引用类型则代表null。
Scala中的初始化器=_,如果写成:
var celsius
这样就成了抽象变量(以后到了「抽象成员」这一章介绍),而不是一个没有初始化的变量。 这个和Java的习惯很不一样。
使用的例子:
  scala> val t = new Thermometer
  t: Thermometer = 32.0F/0.0C

  scala> t.celsius = 100

  scala> t
  res3: Thermometer = 212.0F/100.0C

  scala> t.fahrenheit = -40

  scala> t
  res4: Thermometer = -40.0F/-40.0C
案例:离散事件模拟
来个SICP(Structure and Interpretation of Computer Programs,计算机程序的构造与 解释)里的例子。
为数字电路定制语言
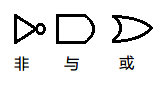
为了实现这三种基本的门,我们建立一个Wire类代表线路。可以这样构造线路:
val a = new Wire
val b = new Wire
val c = new Wire
或简洁地写成:
val a, b, c = new Wire
三个基本的门电路由以下三个过程模拟:
  def inverter(input: Wire, output: Wire)
  def andGate(a1: Wire, a2: Wire, output: Wire)
  def orGate(o1: Wire, o2: Wire, output: Wire)
注意这里的过程都没有返回值。按照函数式的思想,应该是返回构造好的门对象。但是在
这里我们选择了没有返回值,而是通过副作用来模拟门电路。副作用让一步步渐进地构造
复杂的电路更加容易,如inverter(a,b)在a与b之间放置反转电路。
还有这里的方法名没有用动词而是用了名词,这是为了方便说明制造的是哪个门电路。这 反映了DSL说明的本质:应该描述电路,而不是如何制造它。
下面是一个半加法器(half-adder)。它根据两个输入a和b产生累加和s。
累加的定义为:s= (a+b)%2及进位c,其中的c = (a+b)/2。
半加法器电路图:

用我们的代码描述:
  def halfAdder(a: Wire, b: Wire, s: Wire, c: Wire) {
    val d, e = new Wire
    orGate(a, b, d)
    andGate(a, b, c)
    inverter(c, e)
    andGate(d, e, s)
  }
接下来是一个全加法器,定义为根据参数a和b还有进位cin得到两个输出。一个是和
sum = (a+b+cin)%2,另一个是进位输出count = (a+b+cin)/2:
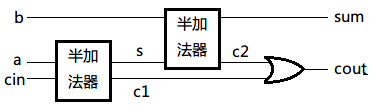
代码为:
  def fullAdder(a: Wire, b: Wire, cin: Wire,
      sum: Wire, cout: Wire) {

    val s, c1, c2 = new Wire
    halfAdder(a, cin, s, c1)
    halfAdder(b, s, sum, c2)
    orGate(c1, c2, cout)
  }
这是内部DSL很好的例子:通过宿主语言将特定的语言定义为库面不是完全实现这种语言。
Simulation API
完成了对电路的模拟以后,再来分析对时间的模拟。模拟时间包括在指定时间执行指定的 动作。
私有变量保存时间,但提供对时间的公开访问:
  private var curtime: Int = 0

  def currentTime: Int = curtime
定义动作:在我们的例子中,把参数列表和返回都为空的过程() => Unit作为基本的动作
。给这样类型的过程起个别名叫Action:
type Action = () => Unit
在特定时间执行的的操作定义为工作项目(work item):
case class WorkItem(time: Int, action: Action)
注意这里用的是样本类,所以用工厂方法创建实例就可以自动获得访问构造器参数time和
action的方法。
还有一个类来保存末执行工作条目的排程表(agenda),注意它是按时间排序的:
private var agenda: List[WorkItem] = List()
提供在一定 时延后加入新的工作条目的方法,注意加入操作也要排序:
  def afterDelay(delay: Int)(block: => Unit) {
    val item = WorkItem(currentTime + delay, () => block)
    agenda = insert(agenda, item)
  }

  private def insert(ag: List[WorkItem],
      item: WorkItem): List[WorkItem] = {
    if (ag.isEmpty || item.time < ag.head.time) item :: ag
    else ag.head :: insert(ag.tail, item)
  }
核心是run方法:
  def run() {
    afterDelay(0) {
      println("*** simulation started, time = "+
          currentTime +" ***")
    }
    while (!agenda.isEmpty) next()
  }

  private def next() {
    (agenda: @unchecked) match {
      case item :: rest =>
        agenda = rest
        curtime = item.time
        item.action()
    }
  }
注意这里为了方便去掉了空列表的情况。为了防止编译器警告我们在模式匹配里故意漏掉了
列表为空的情况,在这里使用了(agenda: @unchecked) match而不是agenda match。
完整的代码在包org.stairwaybook.simulation里:
  abstract class Simulation {

    type Action = () => Unit

    case class WorkItem(time: Int, action: Action)

    private var curtime = 0
    def currentTime: Int = curtime

    private var agenda: List[WorkItem] = List()

    private def insert(ag: List[WorkItem],
        item: WorkItem): List[WorkItem] = {

      if (ag.isEmpty || item.time < ag.head.time) item :: ag
      else ag.head :: insert(ag.tail, item)
    }

    def afterDelay(delay: Int)(block: => Unit) {
      val item = WorkItem(currentTime + delay, () => block)
      agenda = insert(agenda, item)
    }

    private def next() {
      (agenda: @unchecked) match {
        case item :: rest =>
          agenda = rest
          curtime = item.time
          item.action()
      }
    }

    def run() {
      afterDelay(0) {
        println("*** simulation started, time = "+
            currentTime +" ***")
      }
      while (!agenda.isEmpty) next()
    }
  }
电路模拟
这里创建了BasicCircuitSiomulation来模拟电路。
为了模拟电路和延迟声明了三个方法:InverterDelay、AndGateDelay、OrGateDelay。由于
不同模拟电路的技术参数不同,所以这三个方法是抽象方法。
Wire类
需要支持的三种基本动作:
getSignal: Boolean:返回当前线路上的信号。
setSignal(sig: Boolean):设置线路信号。
addAction(p: Action):添加动作到线路上。基本思想是所有附加在某线路上的动作过程
在每次信号改变时被执行。通过连接组件可以为线路添加该组件的功能。加上的动作会在被
加到线路时以及每次线路信号改变时被执行。
实现代码sigVal代表当前信号,actions是附加的动作过程。需要注意的是setSignal
方法,当信号改变时,新的信号首先被保存在变量sigVal中,然后执行所有线路附加
动作:
  class Wire {
    private var sigVal = false
    private var actions: List[Action] = List()

    def getSignal = sigVal

    def setSignal(s: Boolean) =
      if (s != sigVal) {
        sigVal = s
        actions foreach (_ ())
      }

    def addAction(a: Action) = {
      actions = a :: actions
      a()
    }
  }
注意上面的缩写格式:actions forearch(_())代表对每个元素执行_()。在「函数和装饰」这一章的
「占位符」部分说明过,函数_()是f => f()的缩写,代表空参数函数。
反转操作
inverter方法会在安装之后以及每次线路信号变化时被调用。它通过setSignal把输出设为输入的反值。
另外,由于还要模拟电路的响应时间,所以输入值改变以后,还要等InverterDelay单位的模拟时间后,
才发生改变:
  def inverter(input: Wire, output: Wire) = {
    def invertAction() {
      val inputSig = input.getSignal
      afterDelay(InverterDelay) {
        output setSignal !inputSig
      }
    }
    input addAction invertAction
  }
注意这里的afterDelay方法是把这个操作加到队列的最后面。
与门和或门操作
大致思想和上面类似:
  def andGate(a1: Wire, a2: Wire, output: Wire) = {
    def andAction() = {
      val a1Sig = a1.getSignal
      val a2Sig = a2.getSignal
      afterDelay(AndGateDelay) {
        output setSignal (a1Sig & a2Sig)
      }
    }
    a1 addAction andAction
    a2 addAction andAction
  }

  def orGate(o1: Wire, o2: Wire, output: Wire) {
    def orAction() {
      val o1Sig = o1.getSignal
      val o2Sig = o2.getSignal
      afterDelay(OrGateDelay) {
        output setSignal (o1Sig | o2Sig)
      }
    }
    o1 addAction orAction
    o2 addAction orAction
  }
模拟输出
通过探针(probe)观察线路上信号的改变。
还是在信号改变时被调用,显示输出线路的名称、模拟时间、信号值:
  def probe(name: String, wire: Wire) {
    def probeAction() {
      println(name +" "+ currentTime +
          " new-value = "+ wire.getSignal)
    }
    wire addAction probeAction
  }
运行模拟器
BasicCircuitSimulation继承了CircuitSimulation
  package org.stairwaybook.simulation

  abstract class CircuitSimulation
    extends BasicCircuitSimulation {

    def halfAdder(a: Wire, b: Wire, s: Wire, c: Wire) {
      val d, e = new Wire
      orGate(a, b, d)
      andGate(a, b, c)
      inverter(c, e)
      andGate(d, e, s)
    }

    def fullAdder(a: Wire, b: Wire, cin: Wire,
        sum: Wire, cout: Wire) {

      val s, c1, c2 = new Wire
      halfAdder(a, cin, s, c1)
      halfAdder(b, s, sum, c2)
      orGate(c1, c2, cout)
    }
  }
剩下的电路延迟时间和定义被模拟的电路都留在Scala交互Shell中实现:
  scala> import org.stairwaybook.simulation._
  import org.stairwaybook.simulation._
定义延迟时间:
  scala> object MySimulation extends CircuitSimulation {
       | def InverterDelay = 1
       | def AndGateDelay = 3
       | def OrGateDelay = 5
       | }
  defined module MySimulation
定义一下简化以后对MySimulation的引用:
  scala> import MySimulation._
  import MySimulation._
定义线路的部分。先定义四根线路,再把探针放在其中的两根上。探针会立即输出结果:
  scala> val input1, input2, sum, carry = new Wire
  input1: MySimulation.Wire =
      simulator.BasicCircuitSimulation$Wire@111089b
  input2: MySimulation.Wire =
      simulator.BasicCircuitSimulation$Wire@14c352e
  sum: MySimulation.Wire =
      simulator.BasicCircuitSimulation$Wire@37a04c
  carry: MySimulation.Wire =
      simulator.BasicCircuitSimulation$Wire@1fd10fa

  scala> probe("sum", sum)
  sum 0 new-value = false

  scala> probe("carry", carry)
  carry 0 new-value = false
加上半加法器:
scala> halfAdder(input1, input2, sum, carry)
逐次把两根输入线信号设为true,并执行模拟过程:
  scala> input1 setSignal true

  scala> run()
  *** simulation started, time = 0 ***
  sum 8 new-value = true

  scala> input2 setSignal true

  scala> run()
  *** simulation started, time = 8 ***
  carry 11 new-value = true
  sum 15 new-value = false
全部代码如下:
package org.stairwaybook.simulation

abstract class BasicCircuitSimulation extends Simulation {

  def InverterDelay: Int
  def AndGateDelay: Int
  def OrGateDelay: Int

  class Wire {

    private var sigVal = false
    private var actions: List[Action] = List()

    def getSignal = sigVal

    def setSignal(s: Boolean) =
      if (s != sigVal) {
        sigVal = s
        actions foreach (_ ())
      }

    def addAction(a: Action) = {
      actions = a :: actions
      a()
    }
  }

  def inverter(input: Wire, output: Wire) = {
    def invertAction() {
      val inputSig = input.getSignal
      afterDelay(InverterDelay) {
        output setSignal !inputSig
      }
    }
    input addAction invertAction
  }

  // continued in Listing 18.10...
  // ...continued from Listing 18.9
  def andGate(a1: Wire, a2: Wire, output: Wire) = {
    def andAction() = {
      val a1Sig = a1.getSignal
      val a2Sig = a2.getSignal
      afterDelay(AndGateDelay) {
        output setSignal (a1Sig & a2Sig)
      }
    }
    a1 addAction andAction
    a2 addAction andAction
  }

  def orGate(o1: Wire, o2: Wire, output: Wire) {
    def orAction() {
      val o1Sig = o1.getSignal
      val o2Sig = o2.getSignal
      afterDelay(OrGateDelay) {
        output setSignal (o1Sig | o2Sig)
      }
    }
    o1 addAction orAction
    o2 addAction orAction
  }

  def probe(name: String, wire: Wire) {
    def probeAction() {
      println(name +" "+ currentTime +
          " new-value = "+ wire.getSignal)
    }
    wire addAction probeAction
  }
}

abstract class Simulation {

  type Action = () => Unit

  case class WorkItem(time: Int, action: Action)

  private var curtime = 0
  def currentTime: Int = curtime

  private var agenda: List[WorkItem] = List()

  private def insert(ag: List[WorkItem],
      item: WorkItem): List[WorkItem] = {

    if (ag.isEmpty || item.time < ag.head.time) item :: ag
    else ag.head :: insert(ag.tail, item)
  }

  def afterDelay(delay: Int)(block: => Unit) {
    val item = WorkItem(currentTime + delay, () => block)
    agenda = insert(agenda, item)
  }

  private def next() {
    (agenda: @unchecked) match {
      case item :: rest =>
        agenda = rest
        curtime = item.time
        item.action()
    }
  }

  def run() {
    afterDelay(0) {
      println("*** simulation started, time = "+
          currentTime +" ***")
    }
    while (!agenda.isEmpty) next()
  }
}


abstract class CircuitSimulation
  extends BasicCircuitSimulation {

  def halfAdder(a: Wire, b: Wire, s: Wire, c: Wire) {
    val d, e = new Wire
    orGate(a, b, d)
    andGate(a, b, c)
    inverter(c, e)
    andGate(d, e, s)
  }

  def fullAdder(a: Wire, b: Wire, cin: Wire,
      sum: Wire, cout: Wire) {

    val s, c1, c2 = new Wire
    halfAdder(a, cin, s, c1)
    halfAdder(b, s, sum, c2)
    orGate(c1, c2, cout)
  }
}

 object MySimulation extends CircuitSimulation {
           def InverterDelay = 1
           def AndGateDelay = 3
           def OrGateDelay = 5

  def main(args: Array[String]) {
    val input1, input2, sum, carry = new Wire

    probe("sum", sum)
    probe("carry", carry)
    halfAdder(input1, input2, sum, carry)

    input1 setSignal true
    run()

    input2 setSignal true
    run()
  }
}
实现列表
列表不是Scala语言的内建结构,而是定义在Scala包中的List抽象类。它有一个子类
::和一个子对象Nil。
List类实现原理
本节的目的是实现一个简化的List实现:
  package scala
  abstract class List[+T] { ... }
作为一个抽象类List不能用像new List这样的空构造器构建,由类型参数[+T]表明
列表是协变的。
  scala> val xs = List(1, 2, 3)
  xs: List[Int] = List(1, 2, 3)

  scala> var ys: List[Any] = xs
  ys: List[Any] = List(1, 2, 3)
实现的目标要有以下三个功能:
    def isEmpty: Boolean
    def head: T
    def tail: List[T]
这三个方法在List类中是抽象的,被定义在Nil和::中。
Nil对象
Nil对象继承自List[Nothing],它定义了空列表。因为协变的作为它可以兼容任何类型
的List实例:
  case object Nil extends List[Nothing] {
    override def isEmpty = true
    def head: Nothing =
      throw new NoSuchElementException("head of empty list")
    def tail: List[Nothing] =
      throw new NoSuchElementException("tail of empty list")
  }
成员方法head的实现方法是抛出异常,因为对于成员类型Nothing来说,返回结果必须
是Nothing,而Nothing是个根本不存在的类型,所以它无法正常返回结果,只能抛出
异常。
Cons类
::类读作「cons」,意思是「构造」,它实现了非空列表。「使用列表」这一章中「列表模式」里
说过模式中的每个中缀调用被作为构造器调用。
- 就是说:`x
- xs
是对类::的构造器调用::(x, xs)`。
  final case class ::[T](hd: T, tl: List[T]) extends List[T] {
    def head = hd
    def tail = tl
    override def isEmpty: Boolean = false
  }
hd是头一个元素,tl是其他的所有元素。上面的代码可以简化,直接由参数实现超类
List的head和tail方法:
  final case class ::[T](head: T, tail: List[T])
      extends List[T] {

    override def isEmpty: Boolean = false
  }
其他的类方法
  def length: Int =
    if (isEmpty) 0 else 1 + tail.length

  def drop(n: Int): List[T] =
    if (isEmpty) Nil
    else if (n <= 0) this
    else tail.drop(n - 1)

  def map[U](f: T => U): List[U] =
    if (isEmpty) Nil
    else f(head) :: tail.map(f)
列表构建
对于冒号结束的操作符::和:::,它们的操作都是绑定在右操作数上的。即:
x :: xs
被看作是:
xs.::(x)
因为x是列表元素可以是任意类型,所以不能假设它正好是具有::方法的
类型。也由于这个原因::方法应该生成一个新的列表。
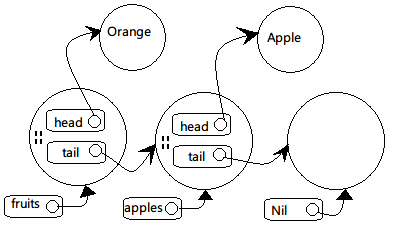
还有值得讨论的地方是新加入元素的类型。思维惯性上会认为和列表元素是同一类型,但 实际上可用的范围更大。以下面的层级关系为例:
  abstract class Fruit
  class Apple extends Fruit
  class Orange extends Fruit


  scala> val apples = new Apple :: Nil
  apples: List[Apple] = List(Apple@585fa9)

  scala> val fruits = new Orange :: apples
  fruits: List[Fruit] = List(Orange@cd6798, Apple@585fa9)
上面的例子说明新加入的元素可以产生超类类型的列表。实现这样弹性的::方法:
def ::[U >: T](x: U): List[U] = new scala.::(x, this)
注意方法本身是多态的,类型参数是U,添加的元素类型必须是U,返回结果类型是
List[U]。而[U >: T]限定列表元素T的超类。
结合前面的例子,U被实例化为Fruit。因为List[Apple]中的Apple是Fruit的
子类,于是U的下界被满足。
实际上对带有下界的T定义不只是为了方便,更加是为类型正确。因为List是协变的,
如果用下面的形式:
  // Error
  def ::(x: T): List[T] = new scala.::(x, this)
因为方法参数被认为是逆变位置,所以上面的列表元素类型T处于逆变位置。这样List
就不能被声明为T保持协变了。所以使用下界[U >: T],即加强了类型检查,又让使用
更加有弹性。
连接列表方法
连接列表的实现方法差不多:
    def :::[U >: T](prefix: List[U]): List[U] =
      if (prefix.isEmpty) this
      else prefix.head :: prefix.tail ::: this
因为::与:::是右关联的,所以下面四个语句其实相等:
  prefix.head :: prefix.tail ::: this
  prefix.head :: (prefix.tail ::: this)
  (prefix.tail ::: this).::(prefix.head)
  this.:::(prefix.tail).::(prefix.head)
ListBuffer类
列表的典型访问模式是递归,比如有一个让列表所有元素自加1的方法:
  def incAll(xs: List[Int]): List[Int] = xs match {
    case List() => List()
    case x :: xs1 => x + 1 :: incAll(xs1)
  }
这个方法有个问题:incAll是在::运算里面的,不是尾递归,堆栈的爆掉的危险。所以
要换个用循环的方案:
for (x <- xs) // ??
那循环体内怎么写?前面的incAll递归方案可以通过加前缀操作;循环只能通过加后缀,
但:::操作时间与第一个列表长度成正比,效率很差:
  var result = List[Int]()    // a very inefficient approach
  for (x <- xs) result = result ::: List(x + 1)
  result
较好的办法是使用列表缓冲(list buffer)收集元素,最后用toList方法一次转换为
列表。
类ListBuffer位于scala.collection.mutable包中,而且它经过优化的增减操作与
toList操作都只要很短的常量时间就可以完成:
  import scala.collection.mutable.ListBuffer

  val buf = new ListBuffer[Int]
  for (x <- xs) buf += x + 1
  buf.toList
实际的List类实现
虽然我们自己实现的List类很简洁,但实际上在遍历列表时为了避免递归一般都使用列表
缓冲与循环结合的方式。比如真正的List类是这样实现map方法的:
  final override def map[U](f: T => U): List[U] = {
    val b = new ListBuffer[U]
    var these = this
    while (!these.isEmpty) {
      b += f(these.head)
      these = these.tail
    }
    b.toList
  }
看了以上的代码后,大家可能会对最后b.toList的效率感兴趣。实际上它的效率与列表的
长度无关。关于原因可以看一下::类的实现:
  final case class ::[U](hd: U,
      private[scala] var tl: List[U]) extends List[U] {

    def head = hd
    def tail = tl
    override def isEmpty: Boolean = false
  }
可以看到参数tl的类型是var,所以列表除了头一个元素以下的部分还是可以改变的。
而且修饰符private[scala]限定只有scala包中可以访问它。而修改它的是
scala.collection.mutable中的ListBuffer。
ListBuffer的元素被表示为列表,而添加新元素操作只对列表中最后一个::单元的t1
字段修改:
  package scala.collection.immutable
  final class ListBuffer[T] extends Buffer[T] {
    private var start: List[T] = Nil       // 所有元素的列表
    private var last0: ::[T] = _           // 最后一个 '::' 成员
    private var exported: Boolean = false  // 是否执行过toList操作
toList方法的实现也很简单。它返回由start指向的列表,如果列表非空,就设置
exported为true:
  override def toList: List[T] = {
    exported = !start.isEmpty
    start
  }
toList返回的列表应该是不可变的实例。那如果在这以后又被添加了元素的话,就不得不
改变start指向的列表。所以为了维护正确性,由+=方法转向对一个新列表进行操作:
  override def += (x: T) {
    if (exported) copy()
    if (start.isEmpty) {
      last0 = new scala.::(x, Nil)
      start = last0
    } else {
      val last1 = last0
      last0 = new scala.::(x, Nil)
      last1.tl = last0
    }
  }
上面的逻辑中可以看出,如果没有被toList过,还可以在原来的列表上修改。如果已经
生成过列表了,那复制操作就不可避免。
外在的函数式风格
回顾本章的内容可以感受到:指使式方案可以避免重复复制以提高效率;函数式风格以不可 改变与不共享数据让程序变得更加可靠。
Scala官方的实现方式让程序在外部看来是函数式,而内部实现在不得已的情况下使用 指令式实现。这样的实现可以被称作「外在函数式风格」。