Akka起步
基础API
Actor
akka.actor.Actor是实现Actor模式的主体:
class ScalaPongActor extends Actor {

	override def receive: Received = {
		case "Ping" => sender() ! "Pong"
		case _      =>
			sender() ! Status.Failure(
					new Exception("Unknow Message"))
	}

}
receive方法:业务逻辑
通过重写receive方法实现主逻辑:
override def receive: Received = { ... }
返回类型Receive其实就是一个scala.PartialFunction[Any, Unit]:
scala> val pf: PartialFunction[Any, Unit] = {
     |     case msg: String => println(s"Got a String: $msg")
     | }
pf: PartialFunction[Any,Unit] = <function1>

scala> pf("hello, world")
Got a String: hello, world

scala> pf(3.3)
scala.MatchError: 3.3 (of class java.lang.Double)
	at scala.PartialFunction$$anon$1.apply(PartialFunction.scala:253)
	at scala.PartialFunction$$anon$1.apply(PartialFunction.scala:251)
	at $anonfun$1.applyOrElse(<console>:7)
	at scala.runtime.AbstractPartialFunction.apply(AbstractPartialFunction.scala:36)
	... 33 elided
sender方法:得到消息的发送方
得到的发送方类型是ActorRef。
tell方法:发出消息
tell()在scala中一般用别名!()。方法声明:
def !(message: Any)(implicit sender: ActorRef = Actor.noSender): Unit
代表发送方的参数sender一般由Actor中代表自身的隐式变量self自动给出,
不用写出来:
implicit final val self = context.self
Failure类型:失败的消息类型
返回一条代表失败状态的信息,类型为akka.actor.Status.Failure
ActorSystem类
akka.actor.ActorSystem抽象了整个Actor系统的实例,
并带有一系列的方法用来创建与维护Actor实例。
ActorPath
ActorPath类似于URL,用来定位一个具体的Actor。它的格式类似于:
// 本地的Actor
akka://${actor-system-name}/${path-floder}/${actor-name}

// 远程的Actor
akka.tcp://${actor-system-name}}@${host}:${port}/${path-floder}/${actor-name}
Actor路径包含两部分:
源部分:
akka://${actor-system-name}
路径部分:
/${path-floder}/${actor-name}
源可以在本地(akka://ActorSystem),也可以在远程
(akka.tcp://ActorSystem@127.0.0.7:2552)。
Actor的路径描述代表Actor的层级:
-
顶层为根Actor,路径为:
/。 -
下面是守护Actor,路径为:
/user -
使用
actorSystem.actorOf()函数创建的所有Actor都是守护Actor的子Actor,路径为:/usr/yourActor -
在Actor内部用
context().actorOf()为当前Actor创建子Actor,路径为:/usr/yourActor/newChild
根Actor还有其他的子目录:
-
与操作系统相关的是系统守护Actor,路径为:
/system -
用于实现Future的临时Actor,路径为:
/temp
ActorSelection与ActorRef:对Actor实例的引用
akka.actor.ActorSelection与akka.actor.ActorRef封装了对Actor实例的引用。
一般在程序中很少直接使用Actor的实例,而是使用经过封装过的ActorRef或是
ActorSelection。
根据现有的ActorRef,可以使用actorRef.path()得到ActorPath。
ActorRef除了ActorPath外,还有Actor的UID,如:#123456。
ActorPath只包含Actor的路径。
创建与使用Actor
创建ActorSystem实例
通过工厂方法创建ActorSystem实例:
// 指定ActorSystem的名字为:test-actor-system
val actorSystem: ActorSystem = ActorSystem("test-actor-system")
新建一个本地的Actor
actorSystem.actorOf()方法新建一个本地的Actor,提到一个ActorRef:
创建一个名为test-actor-system的ActorSystem:
val actorSystem: ActorSystem = ActorSystem("test-actor-system")
创建一个名为test-actor的Actor,这样这个Actor的ActorPath为
akka://test-actor-system/user/test-actor:
val actor: ActorRef = actorSystem.actorOf(
		Props(classOf[ScalaPongActor]), name = "test-actor")
这种方式把具体的Actor封闭起来,不让其他代码直接访问。
与Actor相关的参数都传给一个Props实例。
Props类:封装相关属性
为了把具体的Actor封闭起来,不让其他代码直接访问。
相关的参数都传给一个akka.actor.Props实例。
通过Actor类型和变长的参数列表来创建属性实例:
Props(classOf[PongActor], arg1, arg2, ...)
后面的那一串可变长的参数列表是传递给Actor构造函数用的。 比如有一个Actor类型需要一个String构造参数,那么推荐方案是创建一个工厂方法, 专门用来生成Props:
object ScalaPongActor {

	def props(response: String): Props =
		Props(classOf[ScalaPongActor], response)

}
然后就可以用Props的工厂方法来创建Actor:
val actor: ActorRef = actorSystem.actorOf(ScalaPongActor props "PongFoo")
这种方式的好处是在同一个地方管理所有的Pops对象的创建工作, 从而能把对Actor构造参数的修改与其他的业务代码隔离。
通过ActorPath引用本地或远程的Actor
无论是远程还是本地的Actor都可以通过ActorSelection类型的引用来操作。
actorSystem.actorSelection()方法根据ActorPath得到ActorSelection:
用ActorPath查找本地的Actor:
val testActor02: ActorSelection = actorSystem.actorSelection(
		"akka://test-actor-system-02/user/test-actor-02")
用ActorPath查找远程的Actor:
val testActor: ActorSelection = actorSystem.actorSelection(
		"akka.tcp://localhost:2552/test-actor-system/user/test-actor")
在使用经过封闭的引用过程中,不必关心是远程还是本地的。 只要修改配置就可以在本地应用与远程应用之间切换。
远程Actor寻址
ActorSelection对应的Actor并不一定存在,如果不存在,向它发出的消息都会丢失。 所以要先查询远程Actor,再得到它指向ActorRef。
使用Identify寻找远程Actor
所有Actor都默认接收akka.actor.Identify消息,并返回ActorRef:
val msg: Identify = new Identify(messageId)

val identity: Future[ActorIdentify] =
	(sentinelClient ? msg).mapTo[ActorIdentity]
如果存在,得到ActorIdentity(messageId, Some(actorRef));
不存在就得到ActorIdentity((path, client), None)。
注意查询操作是异步的,得到的结果是封装为Future的异步任务。
Promis与Future
AskableActorRefFuture类:异步Actor
akka.pattern.AskableActorRef是异步的Actor类。
akka.pattern.ask中有隐式转换可以把ActorSelection或ActorRef转为
AskableActorRef:
implicit def ask(actorSelection: ActorSelection): AskableActorSelection
implicit def ask(actorRef: ActorRef): AskableActorRef
ask方法:返回Future
def ?(message: Any)
	(implicit timeout: Timeout,
		sender: ActorRef = Actor.noSender): Future[Any]
timeout与sender这两个参数都可以通过隐式值传入。例:
val system = ActorSystem()
val pongActor = system.actorOf(Props(classOf[ScalaPongActor]))

//结果的返回类型是`Future[Any]`,要用`Future.mapTo`方法注明真实的类型
val future = (pongActor ? "Ping").mapTo[String]
一般Await.result()是测试时用来阻塞线程的:
val result = Await.result(future, 1 second)
如果是在正常应用中把成功的后续逻辑加在onSuccess()方法中:
// onSuccess方法的ExecutionContext类型的隐式参数的值
import scala.concurrent.ExecutionContext.Implicits.global

future.onSuccess({
	case x: String => println("replied with: " + x)
})
Await类:阻塞线程
一般在测试代码中要等待异步操作执行完成。所以要用到:scala.concurrent.Await
result方法:等待返回值
一般在测试代码中要等待异步操作执行完成。所以在指定的时间限制内等待返回结果:
import scala.concurrent.duration.DurationInt

val result = Await.result(future.mapTo[String], 1 second)
Future类:异步任务
scala.concurrent.Future
mapTo方法:类型转换
很多情况下Future结果中的类型信息已经被抹除,要用mapTo方法注明真实的类型:
def mapTo[S](implicit tag: ClassTag[S]): Future[S]
例如:
future.mapTo[String]
OnSuccess方法:异步成功的后续操作
def onSuccess[U](pf: PartialFunction[T, U])
	(implicit executor: ExecutionContext): Unit
例:
// onSuccess方法的ExecutionContext类型的隐式参数的值
import scala.concurrent.ExecutionContext.Implicits.global

(pongActor ? "Ping").mapTo[String].onSuccess({
			case x: String => println("replied with: " + x)
		})
模式匹配可以更加简化一步:
// onSuccess方法的ExecutionContext类型的隐式参数的值
import scala.concurrent.ExecutionContext.Implicits.global

(pongActor ? "Ping").mapTo[String].onSuccess {
	case x: String => println("replied with: " + x)
}
map/flatMap方法:对结果进行转换
def map[S](f: (T) ? S)(implicit executor: ExecutionContext): Future[S]

def flatMap[S](f: (T) ? Future[S])(
		implicit executor: ExecutionContext): Future[S]
// map方法的ExecutionContext类型的隐式参数的值
import scala.concurrent.ExecutionContext.Implicits.global

(pongActor ? "Ping").mapTo[String].map(_.charAt(0))
还可以再进一步把结果作为消息异步发给其他Actor:
// map方法的ExecutionContext类型的隐式参数的值
import scala.concurrent.ExecutionContext.Implicits.global

val f: Future[Future[String]] = (pongActor ? "Ping").mapTo[String].map {
		(pongActor ? _).mapTo[String]
	}
为了让类型看看起来更加简单一些,可以使用flatMap():
// flatMap方法的ExecutionContext类型的隐式参数的值
import scala.concurrent.ExecutionContext.Implicits.global

val f: Future[String] = (pongActor ? "Ping").mapTo[String].flatMap(x => {
		(pongActor ? _).mapTo[String]
	})
通过这种方式可以把更多的异步流程连接起来,形成一个串流。
onFailure方法:异步失败的后续流程
val f = def onFailure[U](pf: PartialFunction[Throwable, U])
	(implicit executor: ExecutionContext): Unit
例:
// onFailure方法的ExecutionContext类型的隐式参数的值
import scala.concurrent.ExecutionContext.Implicits.global

val f = (pongActor ? "causeError").mapTo[String].onFailure {
	case e: Exception => println("Got exception")
}
recover/recoverWith方法:异步失败后返回默认值
recover方法可以让程序异步失败后,返回一个有用的值:
def recover[U >: T](pf: PartialFunction[Throwable, U])
	(implicit executor: ExecutionContext): Future[U]
例:
// recover方法的ExecutionContext类型的隐式参数的值
import scala.concurrent.ExecutionContext.Implicits.global

val f = (pongActor ? "causeError").mapTo[String].recover {
	case e: Exception => println("Got exception")
}
对于异步的操作,可以使用recoverWith():
def recoverWith[U >: T](pf: PartialFunction[Throwable, Future[U]])
	(implicit executor: ExecutionContext): Future[U]
例:
// recoverWith方法的ExecutionContext类型的隐式参数的值
import scala.concurrent.ExecutionContext.Implicits.global

val f = (pongActor ? "causeError").mapTo[String].recoverWith({
				case t: Exception => (pongActor ? "Ping").mapTo[String]
			})
链式操作
下面的例子把两个异步操作连接起来,并指定了遇到异常返回默认值:
import scala.concurrent.ExecutionContext.Implicits.global

val f = (pongActor ? "Ping").mapTo[String].flatMap {
	(pongActor ? ("Ping" + _)).mapTo[String]
}.recover {
	case _: Exception => "There was an error"
}
以上代码中的两个异常操作中有任何一个抛出异常,都由返回recover()的定义的结果。
用for推导式组合Future
for推导式也可以用来连接多个Future,相当于是flatMap的语法糖。
看起来可读性更加一些:
val f1 = Future{4}
val f2 = Future{5}

val f = for {
	res1 <- f1
	res2 <- f2
} yield res1 + res2
例,对于以下Actor:
class ScalaPongActor extends Actor {
	override def receive: Receive = {
		case "Ping" => sender() ! "Pong"
		case n: Int => sender() ! n + 1
		case _ => sender() ! Status.Failure(new Exception("unknown message"))
	}
}
的多次调用 :
(pongActor ? 1).mapTo[Int].flatMap {
	(n: Int) => { pongActor ? (n + 1) }
}.mapTo[Int].flatMap {
	(n: Int) => { pongActor ? (n + 1) }
}.mapTo[Int].flatMap {
	(n: Int) => { pongActor ? (n + 1) }
}.mapTo[Int].onSuccess {
	case x: Int =>
		println(">>>>> result is : " + n + " : " + n.getClass)
} // result is : 8 : int
相当于:
(pongActor ? 1).mapTo[Int] flatMap {
	(n: Int) => { (pongActor ? (n + 1)).mapTo[Int] }
} flatMap {
	(n: Int) => { (pongActor ? (n + 1)).mapTo[Int] }
} flatMap {
	(n: Int) => { (pongActor ? (n + 1)).mapTo[Int] }
} onSuccess {
	case n: Int =>
		n should equal(8)
		println(">>>>> result is : " + n + " : " + n.getClass)
}
相当于:
(for {
	n <- (pongActor ? 1).mapTo[Int]
	m <- (pongActor ? (n + 1)).mapTo[Int]
	j <- (pongActor ? (m + 1)).mapTo[Int]
	k <- (pongActor ? (j + 1)).mapTo[Int]
} yield { k }).onSuccess {
	case n: Int =>
		println(">>>>> result is : " + n + " : " + n.getClass)
} // result is : 8 : int
sequence方法:处理Future列表
akka.dispatch.Futures
def sequence[A](in: Iterable[Future[A]], executor: ExecutionContext):
	Future[Iterable[A]]
akka.http.scaladsl.util.FastFuture
def sequence[T, M[_] <: TraversableOnce[_]](in: M[Future[T]])
	(implicit cbf: CanBuildFrom[M[Future[T]], T, M[T]],
	 executor: ExecutionContext): Future[M[T]]
对于一个List[Future]如果只使用简单的map操作,返回的结果还是List[Future]:
import scala.concurrent.ExecutionContext.Implicits.global

val listOfFutures: List[Future[String]] =
	List("Pong", "Pong", "failure").map(x => askPong(x))
但是这样的List[Future]不如Future[List]后续处理起来方便,
所以要用到sequence():
// sequence方法的ExecutionContext类型的隐式参数的值
import scala.concurrent.ExecutionContext.Implicits.global

val futureOfList: Future[List[String]] = Future.sequence(listOfFutures)
远程通信的Actor
服务端
		<dependency>
			<groupId>com.typesafe.akka</groupId>
			<artifactId>akka-remote_${scala-floor.version}</artifactId>
			<version>${akka.version}</version>
		</dependency>
Akka过程通信的配置文件在src/resources/application.conf:
akka {
	actor {
		provider = "akka.remote.RemoteActorRefProvider"
	}
	remote {
		enabled-transports = ["akka.remote.netty.tcp"]
		netty.tcp {
			hostname = "127.0.0.1"
			port = 2552
		}
	}
}
在代码中创建一个ActorSystem并生成Actor实例:
val system = ActorSystem("akkademy")
val helloActor = system.actorOf(Props[AkkademyDb], name = "akkademy-db")
客户端
Akka过程通信的配置文件在src/resources/application.conf:
akka {
	actor {
		provider = "akka.remote.RemoteActorRefProvider"
	}
}
如果client和server在同一台机器上,那么要注意端口不能相同(默认的端口是2552)。 考虑到client不用监听端口,在这里设置端口为0:
akka {
	actor {
		provider = "akka.remote.RemoteActorRefProvider"
	}
	remote {
		enabled-transports = ["akka.remote.netty.tcp"]
			netty.tcp {
				hostname = "127.0.0.1"
					port = 0
			}
	}
}
创建客户端自己的ActorSystem:
implicit val system = ActorSystem("LocalSystem")
通过路径创建远程Actor的引用:
val String remoteAddress = "127.0.0.1:2552"

val remoteDb = system.actorSelection(
		s"akka.tcp://akkademy@$remoteAddress/user/akkademy-db")
发送消息:
remoteDb ? SetRequest(key, value)

remoteDb ? GetRequest(key)
Akka基本消息传递模式
核心的消息模式有四种:
-
Tell:同步的消息,接收者向
sender()回发的消息都会返回给发送者。 - Ask:异步的消息,发出消息后得到一个Future。接收方响应时Future会被完成。
-
Forward:接收方把消息转另另一个Actor,
所有写入给
sender()的消息都会给最初的发送者。 -
Pipe:用于把Future的结果返回给
sender()或另一个Actor。如果正在使用Actor或 处理一个Future,那么使用Pip可以正确地返回Future结束。
Ask消息模式
在调用ask()方法时,akka会在路径'/temp'下生成一个临时的Actor等待响应,
消息接收方的sender()方法得到的也是这个临时的Actor。
当得到响应后就是这个临时的Actor按响应消息完成Future。
超时参数
ask模式一定要指定超时参数,一般都是用Scala隐式参数传入的。
import scala.concurrent.duration._    // 引入Int到Timeout的隐式转换
import akka.pattern.ask

implicit val timeout = akka.util.Timeout(1 second)

val future = actorRef ? "message"
组合多个ask操作
// 因为以后注册的匿名函数会在不同的线程执行
// 上下文环境会变,所以一定要先记下最初的sender
val senderRef = sender()

// 先尝试从缓存拿结果
val cacheResult = cacheActor ? GetRequest(uri)
// 缓存没有再从远程拿结果
val result = cacheResult.recoverWith {
	case _: Exception =>
		val rawData = httpClientActor ? url    // http请求
		rawData flatMap {
			case HttpResponse(rawArticle) =>     // 提取内容
				articleParserActor ? ParseHtmlArticle(rawArticle)
			case x => Future.failed(new Exception(""))
		}
}

// 定义完成操作(以后会更新pipe方式的实现的版本)
result onComplete {
	case scala.util.Success(x: String) =>      // 缓存中拿到了
		senderRef ! x
	case scala.util.Success(x: ArticleBody) => // 缓存中没有,HTTP拿到了
		cachActor ! SetRequest(uri, x.body)
		senderRef ! x
	case scala.util.Failure(t) =>              // 缓存中没有,HTTP拿到了
		senderRef ! akka.actor.Status.Failure(t)
	case x =>
		println("unknow message: " + x)
}
超时错误栈信息用处不大
请求超时异常由akka线程调试器抛出,而不是由Actor本地线程抛出异常。 所以从堆栈信息里是看不到底是哪个ask请求超时了。
必须返回失败消息
Actor是不会在抛出异常后返回任何消息的, 这样消息的发送方永远也等不到这个Actor的响应。 所以代码发生错误时一定要返回失败的消息。
如果Actor抛出一个意料之外的异常,而没有返回错误。这样看起来像是超时引起的, 实际上往往是因为程序员没有定义针对这种异常下应该返回的消息。
Ask模式的使用场景
Ask模式的主要开销在生成临时Actor(占大比例)和Future(占小比例)的开销, 这在Tell模式下是没有的。 对于不用在Actor中保存状态的异步操作,直接用Future性能开销要小很多。
所以Ask模式比较适合带有「分布式」或是「状态与并发」特征的应用。 如果既不用远程访问,也不用在Actor中封闭状态, Akka并不比其他无状态的非阻塞异步类更有优势。
Tell模式
Tell模式下可以不指定消息的发送者,常常被作为一种「fire and forget」的消息机制。 但是也可以通过一些方法来实现「request / reply」风格的消息机制。
Scala中tell方法通过隐匿参数把发消息的Actor作为参数传递进来:
actor ! "message"
如果发送消息的操作不是Actor做的,那么默认不会在响应地址中设置邮件信息 (叫作DeadLetters)。
Java中必须显式给出sender,在Actor系统外发的消息用noSender:
actor.tell("message", akka.actor.AcotrRef.noSender())
Tell模式下记录上下文环境
通过记录上下文环境的方式可以用Tell来「request / reply」风格的消息机制。
把多个上下文环境按不同的key存储起来,这样key加在消息里发出去, 对方也在响应里加上key,这样就可以知道响应是对应哪个上下文环境的了。
使用scheduler对Tell进行超时控制
scheduler能以固定的间歇重复发送消息。Tell模式中通过Scheduler在指定时间后
向Actor发送timeout消息表示失败:
context.system.scheduler.scheduleOnce(3 seconds, actor, "timeout")
用Tell来代替Ask
之前描述过可以通过在发送方Actor的内部用id和上下文环境的key-value映射来模拟ask。 还有一种方式是临时创建一个Actor,再通过Tell模式模拟Ask操作。
临时Actor的主要逻辑如下:
private def buildExtraActor(senderRef: ActorRef, uri: String): ActorRef =
	return context.actorOf(Props(new Actor{
		override def receive = {
			//if we get timeout, then fail
			case "timeout" =>
				senderRef ! Failure(new TimeoutException("timeout!"))
				context.stop(self)
			//If we get the http response first, we pass it to be parsed.
			case HttpResponse(body) =>
				articleParserActor ! ParseHtmlArticle(uri, body)
			//If we get the cache response first, then we handle it and shut down.
			case body: String =>
				//The cache response will come back before the
				//HTTP response so we never parse in this case.
				senderRef ! body
				context.stop(self)
			//If we get the parsed article back, then we've just parsed it
			case ArticleBody(uri, body) =>
				cacheActor ! SetRequest(uri, body) //Cache it as we just parsed it
				senderRef ! body
				context.stop(self)
			//We can get a cache miss
			case t =>
				println("ignoring msg: " + t.getClass)
		}
	}))
临时Actor只要按收到的消息类型就可以决定下一步的流程。注意在超时、缓存命中、
内容提取完成,这三个步骤都是流程已经结束的标志,要stop()结束流程。
在receive块中:
override def receive: Receive = {

	case msg @ ParseArticle(uri) =>
		// 创建临时Actor,注意sender是当前Actor自己
		val extraActor = buildExtraActor(sender(), uri)
		// 发消息给缓存Actor,但发送方是临时Actor
		cacheActor.tell(GetRequest(uri), extraActor)
		// 发消息给HTTP Actor,但发送方是临时Actor,
		// 消息的内容是随便写的,但不影响理解主要思想
		httpClientActor.tell("test", extraActor)

		// 定时向临时Actor以一条超时消息
		context.system.scheduler.scheduleOnce(
				3 seconds, extraActor, "timeout")

}
在这里,我们以临时Actor的名义把消息发给了缓存Actor和HTTP Actor, 这样它们的结果都会发给临时Actor。
最后还发了一个超时消息给临时Actor,这样临时Actor就知道自己是否超时了。
备注:
给httpClientActor发消息的动作应该是在extraActor里,收到缓存未命中的消息时才发的 。但这里为了例子的代码简单就直接发了,相当于两个Actor谁先发响应回来就算谁的。
这里可以看到Tell模式比Ask模式有更多的优势:
- Ask模式每发一次请求都要新建立一个临时Actor,这种方式只要建立一个。
- Ask模式每发一次请求都要新合建一个Future,这里根本不用。
- Ask模式每发一次请求都有超时的可能,这里只有一个需要控制的超时。
当然具体用哪种方案还是要根据具体案例来决定。
Forward模式
Forward和actorRef.tell(msg, sender)的效果一样。只是在语法上看起来更加清晰。
forward方法会隐式传入contex信息:
actor forward msg
// 相当于
actor.forward(msg, getContext())
Pipe模式
在使用Future进行异步的操作过程中,因为回调函数会在另一个线程中执行,
经常要把sender()事先保存一下:
val senderRef = sender()
future.map(x => senderRef ! x)
Pipe模式中无论成功还是失败,Pipe都会把得到的Future的结果返回给sender():
future pipeTo sender()

pipe(future) to sender()
这里的pipe(future)方法把Future作为参数传给sender。因为在同一个线程中,
所以无需事先保存sender的引用。
错误处理
监督机制
Actor以层级结构来实现监督机制,父Actor监督子Actor。 Actor的路径描述代表Actor的层级:
-
顶层为根Actor,路径为:
/。 -
下面是守护Actor,路径为:
/user -
使用
actorSystem.actorOf()函数创建的所有Actor都是守护Actor的子Actor,路径为:/usr/yourActor -
在Actor内部用
context().actorOf()为当前Actor创建子Actor,路径为:/usr/yourActor/newChild
根Actor还有其他的子目录:
-
与操作系统相关的是系统守护Actor,路径为:
/system -
用于实现Future的临时Actor,路径为:
/temp
基本的监督策略
对于Actor遇到的错误,可以采用的策略有:
- 继续(resume):当前错误不会影响其任务,Actor可以处理下一条消息。
- 停止(stop):Actor要停下等修复工作完成,不然处理下一条消息还是错误的结果。
- 重启(restart):当前Actor内部的错误已经无法修复,初始化一个新的来代替它。
- 上报(escalate):当前的错误会影响其他的模块,要向更上一级的监督都汇报。
制定监督策略
如果程序员没有定义,那么Actor采用的是默认的监督策略,
由akka.actor.SupervisorStrategy类型中对应的方法提供实现:
-
Actor抛出异常:
restart() -
Actor发生错误:
escalate() -
Actor初始化异常:
stop() -
如果Actor被「杀」,抛出
ActorKilledException:stop()
要特别注意的是,如果Actor是在构造函数中发生了异常,会抛出
ActorInitializationException,并导致Actor停止运行,最终程序停止。
需要指定自定义策略时,可能通过重写Actor的supervisorStrategy方法,
生成自定义的SupervisorStrategy子类:
用厨师为例,模拟各种错误:
- 不小心打摔盘子,可以继续做下一道菜
- 厨师太累了,但休息一下还可以继续做下一道菜,那就停一下。
- 喝醉了,不能再让厨师再做菜了,换人
- 着火了,换厨师是不能灭火的,要上报
override def supervisorStrategy = {
	OneForOneStrategy() {			 // this is a PartialFunction
		case BrokenPlateException => Resume
		case TiredChefException   => Stop
		case DrunkenFoolException => Restart
		case RestaurantFireError  => Escalate
		case _                    => Excalate
	}
}
重发失败的消息
默认情况下一旦消息抛了异常,该消息会被丢弃,不会再被重新发送。 接着监督都会执行监督策略。
在监督策略中,并不一定要一抛出异常就执行监督策略。 执行监督策略前可以尝试重新发送失败的消息,重试的次数没有限制。 也可以指定重试的限制,比如最多10次或时间最长1分钟,只要达到其中一个就停止重试:
override val supervisorStrategy =
	OneForOneStrategy(maxNrOfRetries = 10, withinTimeRange = 1 minute) {
		case _: ArithmeticException      => Resume
		case _: NullPointerException     => Restart
		case _: IllegalArgumentException => Stop
		case _: Exception                => Escalate
	}
Actor生命周期
Actor生命周期中会调用几个方法:
-
preStart():在构造函数前调用。 -
postStop():在停止后调用。 -
preRestart(reason, msg):在重启前调用,默认会调用postStop()。 -
postRestart():在重启后调用,默认会调用preStart()。
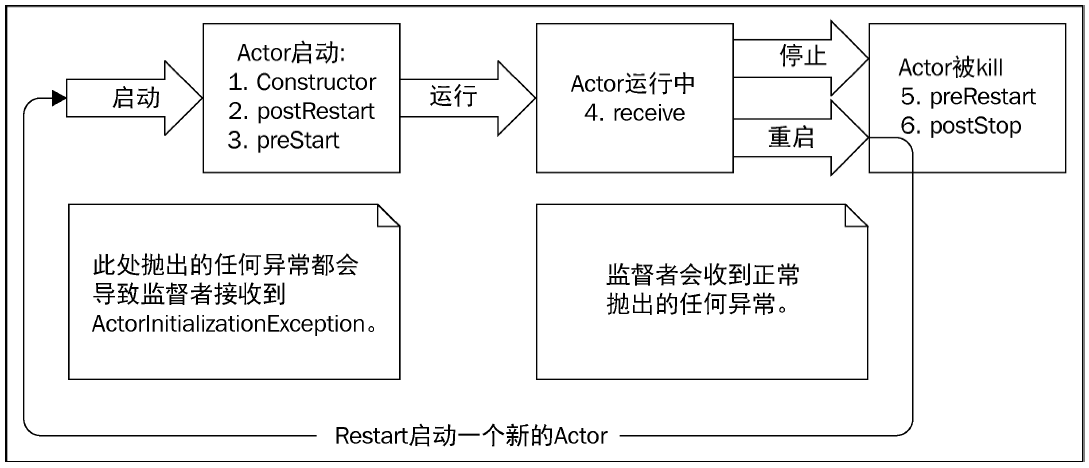
终止或kill一个Actor
-
调用
ActorSystem.stop(actorRef)或ActorSystem.stop(actorRef)。 Actor会立即停止。 -
向Actor发送
PosionPill消息,Actor会在消息处理完后停止。 -
向Actor发送
kill消息,Actor会抛出ActorKilledException, 由监督者决定后续操作。
生命周期监控和DeathWatch
除了父Actor对子Actor的监督,其他Actor也可以通过context.watch(actorRef)
注册对监控另一个Actor的终止状态。如果被监督的Actor终止了,监控方就会收到一个
Terminated(ActorRef)消息。通过context.unwatch(actorRef)可以取消监察注册。
安全地重启Actor
Actor重启可能会导致状态丢失
例子,数据库连接信息不是由构造函数传入的,而是由消息传进来的:
// Actor的构造函数没有参数
var dbActor = createActor(DBActor.props)      // 新的实例并没有创建连接

// 收到消息后才创建的连接
dbActor.tell(new Connection("10.0.8.14", "9001"))
这样的情况下如何Actor重启了,在没有收到connection消息前是没有建立连接的。
通过监督策略在重启后初始化
通过监督策略在重启后初始化是一个可行的方案,但需要在监督Actor中添加额外的代码。
通过构造函数初始化
通过Props把需要的信息传给构造函数,这样更加清晰:
val dbActor = createActor(DBActor.props("10.0.8.14", "9001))
创建连接的操作直接在构造函数中完成,Actor可以从重启动作中正确地恢复状态。
但是如果初始化过程发生了异常,默认的监督机制会停止Actor。所以要有对应的监督策略 来处理Actor无法连接数据库的情况。
Actor状态处理
Actor可以安全地存储状态,从而使用无锁的方式并发处理状态。 以下几种机制可以改变Actor的行为:
- 基于Actor状态的条件语句。
-
热交换(Hotswap):
become()和unbecome()方法。 - 有限自动机。
通过stash机制切换在线、离线状态
最简单的状态就是只有两种状态,比如在可以正常工作的在线状态与不可工作的离线状态 (例如数据库连接断开或未初始化)之间切换。
混入Stash特性的Actor具有stash机制,让客户端不是简单地丢弃无法处理的消息。
而是把暂时无法处理的请求暂存在队列里,等待服务重新上线后再处理。
-
使用
stash()保存当前消息。一般要绑定时间限制,不然邮箱会满。 -
使用
unstash()或unstashAll()从队列中取出消息。
class MyActor extends Actor with Stash {
	var online = false

	override def receive = {
		case job: MyJob =>
			if (online) { doJob(job) } else { stash() }
		case _: Connect =>
			online = true
			unstash()
		case _: DisConnect =>
			online = false
	}

}
这里简单地用了Actor中的成员变量来保存Actor的状态。Akka还提供了其他更好的方案。
stash泄漏
如果stash以后花了太长的时间恢复,那么就会有邮箱满的危险。 简单的方法是建立一个定时任务,超时后发消息给Actor检查是否恢复上线。 还没有恢复就向上级汇报错误:
context.system.scheduler.scheduleOnce(
		3 minuts, self(), CheckConnected, system.dispatcher(), null)
如果Actor收到消息时已经恢复在线,就忽略该消息。如果还是离线状态,就抛异常:
case _: CheckConnected => throw new ConnectTimeoutException
Hotswap热交换机制:Become / Unbecome
Akka提供了become()和unbecome()以声明式的风格实现状态切换,
比用成员变量记录状态具有更佳的可读性。在Actor的context()有两个方法:
-
become(PartialFunction behavior):将receive块中定义的行为修改为一个新的PartialFunction。 -
unbecome():把Actor的receive方法的行为恢复到默认行为。
override def receive = {
	case x: GetRequest =>
		stash()
	case _: Connected	=>
		become(online)          // 恢复到正式工作状态的逻辑
		unstash()
}

def online: Receive = {
	case x: GetRequest	 =>
		processMessage(x)
	case _: Disconnected =>
		unbecome()              // 替换为离线状态的逻辑
}
有限状态自动机
有限状态自动机(Finite State Machine,FSM)也是按基于状态决定行为的变化。 FSM实现的代码不如热交换简单,需要定义更多的类型和代码。
举例子,Actor不对每一个查询请求返回结果,而是等请求累积到了一定的数量, 或是收到了Flush消息,才把多个请求一起查询,并返回结果。 (和Akka官方文档中FSM的例子类似,这里是一个不同的实现版本)
FSM中的类型有两个参数:「状态」和「容器」
定义状态
FSM不像热交换那样stash消息,而是把消息存储在Actor中:
- Disconnected:离线
- Disconnected and Pending:离线并有消息堆积
- Connected:在线
- Connected and Pending:在线并有消息堆积
代码:
sealed trait State

case object Disconnected extends State
case object Connected extends State
case object ConnectedAndPending extends State
定义状态容器
状态窗口是记录消息信息的地方。这里以一个请求列表作为状态容器。 在收到Flush消息的时候会处理这个列表中的请求:
object StateContainerTypes {
	type RequestQueue = List[Request]
}

case object Flush
在FSM中定义行为
FSM中必须混入一个Trait akka.actor.FSM[S,D]:
class BunchingAkkademyClient extends FSM[State, RequestQueue] { }
然后调用startWith()方法定义Actor如何启动:
startWith(Disconnected, null)
接下来就可以定义如何按照不同的状态来决定行为。最简单的方法是调用
when(S state, PartialFunction pf)。多个when()方法就可以对应多种不同的情况:
import akka.actor.FSM


trait Request

case object Flush
case object ConnectedMsg

sealed trait State
case object Disconnected extends State
case object Connected extends State
case object ConnectedAndPending extends State

object StateContainerTypes {
	type RequestQueue = List[Request]
}

class FSMClientActor(address: String) extends FSM[State, RequestQueue]{
	private val remoteDb = context.system.actorSelection(address)

	startWith(Disconnected, List.empty[Request])

	when (Disconnected) {
		// 离线时,收到数据库成功连接信息
		case Event(_: messages.Connected, container: RequestQueue) =>
			if (container.headOption.isEmpty)
				goto(Connected)               // 队列为空,切换到上线但没有任务状态
			else
				goto(ConnectedAndPending)     // 队列不为空,切换到上线且有任务状态
		// 离线时收到查询请求
		case Event(x: Request, container: RequestQueue) =>
			remoteDb ! new messages.Connected     // 尝试重连服务器
			stay using (container :+ x)           // 保存任务等待上线
		case x =>
			println("uhh didn't quite get that: " + x)
			stay()
	}

	when (Connected) {
		// 上线且没有任务的状态,收到查询请求
		case Event(x: Request, container: RequestQueue) =>
			// 切换到上线且有任务状态并保存任务
			goto(ConnectedAndPending) using(container :+ x)
	}

	when (ConnectedAndPending) {
		// 收到Flush消息,把队列里的消息都查询DB,回到连接状态
		case Event(Flush, container) =>
			remoteDb ! container;
			goto(Connected) using Nil
		// 连接而且有任务的状态下收到查询消息,暂存起来
		case Event(x: Request, container: RequestQueue) =>
			stay using(container :+ x)
	}

	// 最后要调用initialize启动状态机
	initialize()
}
例子里没有定义任何收到Disconnected消息后的相关的行为。 因为要切换到Disconnected状态我们采取抛异常并重启Actor。
通过重启转移状态
注意在前面FSM例子里没有定义任何收到Disconnected消息后的相关的行为。 因为要切换到Disconnected状态我们采取抛异常并重启Actor。
要判断Actor是否连接,就用心跳消息的方式。心中消息没有响应就抛异常重启Actor, 并抛弃所有队列里的消息。